Introduction to the Delightful Apple Pie
In the realm of comfort food, few treats can rival the classic apple pie. This iconic dessert, with its flaky crust and sweet, spiced filling, evokes memories of family gatherings and cozy autumn evenings. The aroma of a freshly baked apple pie wafting through the home is a nostalgia-inducing experience; it brings together friends and family around the kitchen table, ready to indulge in a slice of happiness. But making a perfect apple pie is not just about following a recipe; it’s about creating a delightful experience that combines the warmth of home with the joy of baking.
The history of apple pie is as rich as its flavors. This beloved dessert has its roots in medieval Europe, where recipes for apple-filled pastries began to emerge. Over the centuries, it has evolved into a staple of American culture, often associated with the phrase “as American as apple pie.” This affectionate connection to the apple pie speaks to its role not only as a dessert but also as a symbol of home and comfort.
In this comprehensive guide, we will explore the art of crafting a delightful apple pie with a flaky crust, from selecting the right ingredients to mastering the baking technique. Whether you are a seasoned baker or a novice looking to impress at your next gathering, this recipe will equip you with all the knowledge you need to create a pie that will leave everyone asking for seconds.
Understanding the Components of a Great Apple Pie
The Importance of Quality Ingredients
When it comes to making a delightful apple pie, the quality of your ingredients is crucial. Each component of the pie plays a significant role in developing its flavor and texture. The star of the show, of course, is the apple filling. For a truly memorable apple pie, it is imperative to select fresh, seasonal apples. While there are many varieties to choose from, Granny Smith apples stand out for their tartness and firmness. Their natural acidity provides a wonderful contrast to the sweetness of the sugars used in the pie, ensuring a well-balanced filling that is neither too sweet nor too bland.
In addition to apples, the other essential ingredients include flour, sugar, butter, and spices. Each of these contributes uniquely to the overall experience of the pie:
– Flour: The foundation of the pie crust, all-purpose flour provides structure. For a flaky crust, it’s essential to use the right kind of flour and to handle it delicately.
– Sugar: This is not only for sweetness but also for enhancing the natural flavors of the apples. Granulated sugar is typically used in the filling, while a bit of brown sugar can add depth.
– Butter: The type and temperature of butter can make or break the crust. Chilled butter creates layers that lead to a flaky texture, while unsalted butter allows for better control over the saltiness of the pie.
– Spices: Cinnamon and nutmeg are classic spices that elevate the apple filling, adding warmth and depth.
– Lemon Juice: A splash of lemon juice brightens the flavors and balances the sweetness, ensuring that the filling is refreshing and vibrant.
The Science Behind the Flaky Crust
Creating a flaky pie crust involves understanding the chemistry of its components. Flour, fat, and water are the three main players, and each has a specific role. The key to achieving the perfect texture lies in how these ingredients interact.
– Flour: When flour is mixed with water, gluten forms. While some gluten is necessary for structure, too much can lead to a tough crust. This means it’s crucial to handle the dough as little as possible.
– Fat: In this case, butter is the fat of choice. Cold butter is cut into the flour to create small pieces that will later melt during baking. This melting process creates steam, which in turn produces those coveted flaky layers.
– Water: Ice water is added to the mixture to bind the dough without making it sticky. The cold temperature of the water helps keep the butter firm, which is essential for a flaky crust.
Using chilled butter and ice water creates a dough that can be handled with minimal warmth, further ensuring that the butter remains solid until it’s time to bake. This is a fundamental step in achieving the ideal crust that is both flaky and tender.
Preparing the Flaky Crust
Step-by-Step Guide to Making the Dough
Creating the perfect pie crust begins with making the dough. Follow these detailed instructions to ensure a successful outcome:
1. Gather Your Ingredients: You will need 2 ½ cups of all-purpose flour, 1 teaspoon of salt, 1 tablespoon of granulated sugar, and 1 cup (2 sticks) of unsalted butter, chilled and cut into small cubes. Additionally, have ice water ready.
2. Mix the Dry Ingredients: In a large mixing bowl, combine the flour, salt, and sugar. Whisk them together until evenly combined. This step is essential to ensure that the salt and sugar are distributed throughout the flour.
3. Cut in the Butter: Add the chilled butter cubes to the flour mixture. Using a pastry cutter, fork, or your fingertips, work the butter into the flour until the mixture resembles coarse crumbs. There should be visible pieces of butter throughout, as these will create the flaky layers you desire.
4. Add Ice Water: Gradually add ice water, one tablespoon at a time, mixing gently with a fork after each addition. You want to add just enough water for the dough to come together without being sticky. Stop adding water as soon as the dough holds together.
5. Form the Dough: Turn the dough out onto a lightly floured surface. Gather it into a ball, then flatten it into a disk about 1 inch thick. Wrap the disk in plastic wrap and refrigerate for at least one hour. This chilling step is crucial for developing the texture of the crust.
Chilling and Resting the Dough
Refrigerating the dough serves two important purposes. First, it allows the gluten to relax, which will prevent the crust from shrinking during baking. Second, the cold temperature ensures that the butter remains solid, contributing to the flakiness of the pie crust.
After chilling, let the dough rest for an additional 10-15 minutes at room temperature before rolling it out. This brief rest period will make the dough more pliable and easier to work with.
Crafting the Perfect Apple Filling
Selecting the Right Apples
The filling is arguably the most vital component of any apple pie. Selecting the right variety of apples can significantly affect the flavor and texture of the final product. While there are numerous apple varieties available, understanding their flavor profiles is essential for creating the ideal filling.
– Granny Smith Apples: Known for their tart flavor and crisp texture, Granny Smith apples are a top choice for baking. Their firmness holds up well during cooking, preventing the filling from becoming mushy.
– Honeycrisp Apples: If you prefer a sweeter flavor, Honeycrisp apples add a delightful balance when combined with Granny Smith. They offer a juicy texture and a hint of honey-like sweetness.
– Golden Delicious Apples: These apples are softer and sweeter, making them a great addition to the filling if you want to enhance the sweetness without losing the structure.
Combining different apple varieties can create a more complex flavor profile, giving your pie depth and character.
Flavoring the Filling
Once you have selected your apples, it’s time to enhance their natural flavors with spices. The classic combination of cinnamon and nutmeg is a staple in apple pie recipes. Here’s how to incorporate them effectively:
– Cinnamon: This spice adds warmth and depth to the filling. A teaspoon of ground cinnamon is typically sufficient for a standard pie, but feel free to adjust according to your taste.
– Nutmeg: A pinch of freshly grated nutmeg can elevate the flavor profile, adding a subtle warmth that complements the cinnamon.
– Lemon Juice: A tablespoon of lemon juice not only brightens the flavors but also helps prevent the apples from browning. The acidity of the lemon juice balances the sweetness of the filling, ensuring each bite is refreshing.
Combining Ingredients for Optimal Flavor
When preparing the apple filling, it’s essential to combine the ingredients carefully to maintain the integrity of the apples. Here’s how to do it:
1. Prepare the Apples: Peel, core, and slice your chosen apples into even pieces. This step is crucial for even cooking; aim for slices that are about ¼ inch thick.
2. Mix with Sugar and Spices: In a large bowl, toss the sliced apples with granulated sugar, brown sugar, cinnamon, nutmeg, and lemon juice. Use a gentle folding motion to combine the ingredients without bruising the apples.
3. Let it Rest: Allow the mixture to sit for about 10-15 minutes. This resting time will help the apples release some of their juices, creating a flavorful syrup that will enhance the filling.
By following these initial steps, you will lay a solid foundation for your delightful apple pie. The combination of quality ingredients, a well-executed flaky crust, and a perfectly balanced filling will create a dessert that is not only delicious but also a true testament to the art of baking. In the next section, we will dive deeper into assembling and baking your apple pie to perfection.
The Purpose of Cornstarch in Thickening the Filling
Cornstarch plays a crucial role in the filling of your apple pie, acting as a thickening agent that ensures a perfect consistency. When combined with the apple juices released during baking, cornstarch helps to create a silky texture that binds the filling together without becoming overly watery. This is especially important because a runny filling can lead to a soggy crust, ruining the overall experience of your pie. By using cornstarch, you ensure that each slice of your apple pie holds its shape beautifully, allowing for clean cuts and a stunning presentation.
Assembling the Pie
Rolling Out the Dough
Rolling out the dough might seem intimidating, but with a few tips, you’ll achieve the perfect flaky crust. First, ensure your dough is well-chilled before rolling; this will help maintain its structure and prevent stickiness. Dust your work surface with a light coating of flour to prevent the dough from adhering.
When you begin to roll the dough, use a rolling pin and apply even pressure, starting from the center and moving outward in all directions. Turn the dough a quarter turn after a few rolls to maintain a round shape and to prevent sticking. If you find your dough sticking to the surface, sprinkle a little more flour underneath to help ease it off.
Once your dough has reached about 1/8-inch thickness, it’s time to transfer it to the pie dish. Gently roll the dough around the rolling pin, lifting it from the surface, and then unroll it over the pie dish. Be cautious to avoid any tearing. If the dough does break, simply patch it up with your fingers or a bit of extra dough.
Filling the Pie
With the crust in place, the next step is to fill your pie. Begin by distributing your apple filling evenly across the bottom of the crust. The goal is to create an even layer that fills the crust to the brim but does not overflow. A well-balanced filling ensures that each slice of pie is generously filled without compromising the integrity of the crust.
When filling the pie, it’s important to consider the volume of your filling. Overfilling can lead to bubbling and spilling during baking, while underfilling may result in a less satisfying texture. Aim for a slightly mounded filling; the apples will shrink during baking, and you want to compensate for that loss.
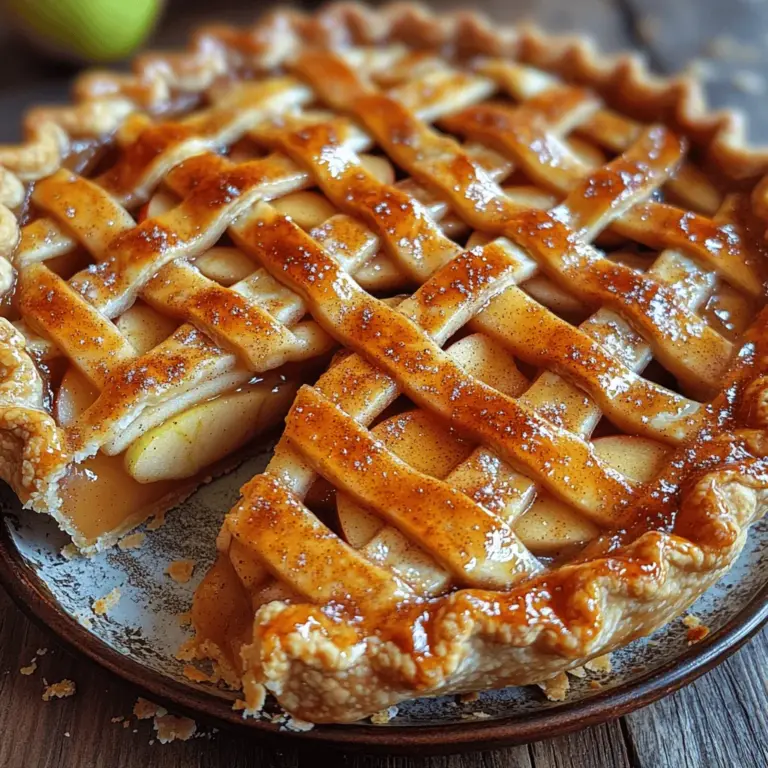
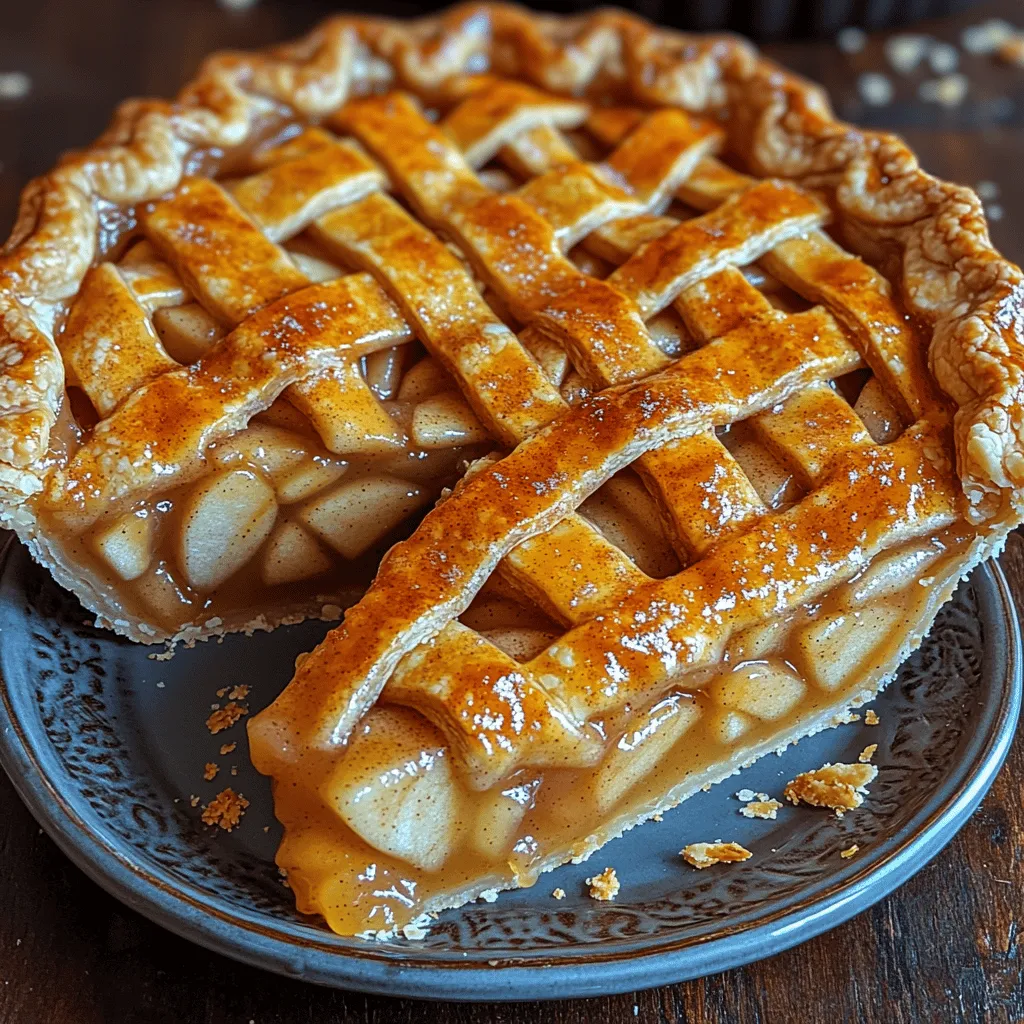
Creating the Top Crust
Now that your pie is filled, it’s time to cover it. You have two primary options: a whole crust or a lattice design. A whole crust provides a classic look, while a lattice crust adds an elegant touch and allows steam to escape during baking, which can help prevent a soggy filling.
To create a lattice crust, roll out a second sheet of dough and cut it into strips about ¾-inch wide. Begin by laying half of the strips horizontally across the filled pie, evenly spaced. Then, take the remaining strips and weave them over and under the horizontal strips, alternating as you go. Once you’ve completed the lattice, trim any excess dough and crimp the edges to seal. This not only enhances the visual appeal but also helps to keep the filling in place.
Baking the Pie to Perfection
Preheating and Initial Baking
Before placing your pie in the oven, preheat it to a high temperature, generally around 425°F (220°C). This initial blast of heat is vital as it helps to set the crust quickly, creating that desirable flaky texture. Additionally, it can help to caramelize the sugars in the filling, enhancing the flavor.
To prepare for any potential drips from your pie, place a baking sheet on the rack below your pie. This will catch any overflow, preventing a messy oven and ensuring an easier cleanup once you’re done baking.
Adjusting Temperature for Even Cooking
After about 20 minutes of baking at the high temperature, it’s time to lower the oven temperature to around 350°F (175°C). This adjustment allows the filling to cook through without burning the crust. Keep an eye on your pie during this stage; the filling should bubble and the crust should turn a beautiful golden brown.
Indicators that your pie is done include a consistently bubbling filling and a beautifully browned crust. If you notice the edges of your crust are browning too quickly, you can cover them with strips of aluminum foil to allow the center to catch up without burning.
Cooling and Serving the Pie
The Importance of Cooling Time
Once your pie has reached the desired golden hue, remove it from the oven and set it on a wire rack to cool. Allowing the pie to cool is crucial as it gives the filling time to set. Cutting into a hot pie can result in a soupy filling, which may not present well. Aim to let your pie cool for at least two hours before slicing. This will give you beautifully defined slices that hold their shape.
When it comes to serving, presentation matters. Consider placing your pie on a decorative cake stand or a simple wooden board for a rustic touch. You can also dust the top with powdered sugar for an elegant finish.
Pairing Suggestions
Apple pie is a versatile dessert that pairs beautifully with a variety of accompaniments. A classic choice is a scoop of vanilla ice cream, which melts slightly over the warm pie, creating a delightful contrast of temperatures. Alternatively, whipped cream can offer a light, airy complement to the pie’s rich flavors.
For a seasonal touch, consider pairing your apple pie with a warm cup of spiced cider or a robust black coffee. These beverages not only enhance the apple flavors but also create a cozy atmosphere, perfect for enjoying your homemade pie.
Conclusion: The Joy of Homemade Apple Pie
Creating a delightful apple pie is an act of love that brings together family and friends around the table. With the right ingredients, techniques, and a bit of patience, anyone can master this timeless dessert. As you savor each slice, you’ll appreciate not only the flavors but also the memories created in the kitchen. Whether it’s for a special occasion or a simple weeknight treat, this apple pie recipe is sure to become a cherished staple in your home.
As you gather around to share your creation, remember that the joy of baking is not solely in the finished product but in the process itself. Each step, from choosing your apples to rolling out the dough, is an opportunity to connect with the ingredients and those you love. So, roll up your sleeves and bake your way to a delightful apple pie that will warm hearts and homes alike.
