Introduction
When summer rolls around, the craving for refreshing and vibrant desserts becomes irresistible, and that’s where Raspberry Lemonade Bars come into play. These delightful treats perfectly encapsulate the essence of summer with their bright flavors and stunning presentation. With just the right balance of tartness from the lemons and sweetness from the raspberries, these bars are a tantalizing option for anyone looking to satisfy their sweet tooth while keeping things light and refreshing.
What makes Raspberry Lemonade Bars particularly appealing is their versatility. Whether you’re hosting a sunny picnic, throwing a backyard barbecue, or simply wanting to impress guests at a family gathering, these bars are sure to steal the spotlight. They can be enjoyed chilled straight from the fridge, making them an ideal choice for warm weather gatherings. Plus, they’re easy to prepare, allowing you to spend more time enjoying the summer sun and less time in the kitchen.
The Allure of Raspberry Lemonade Bars
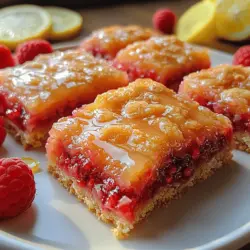
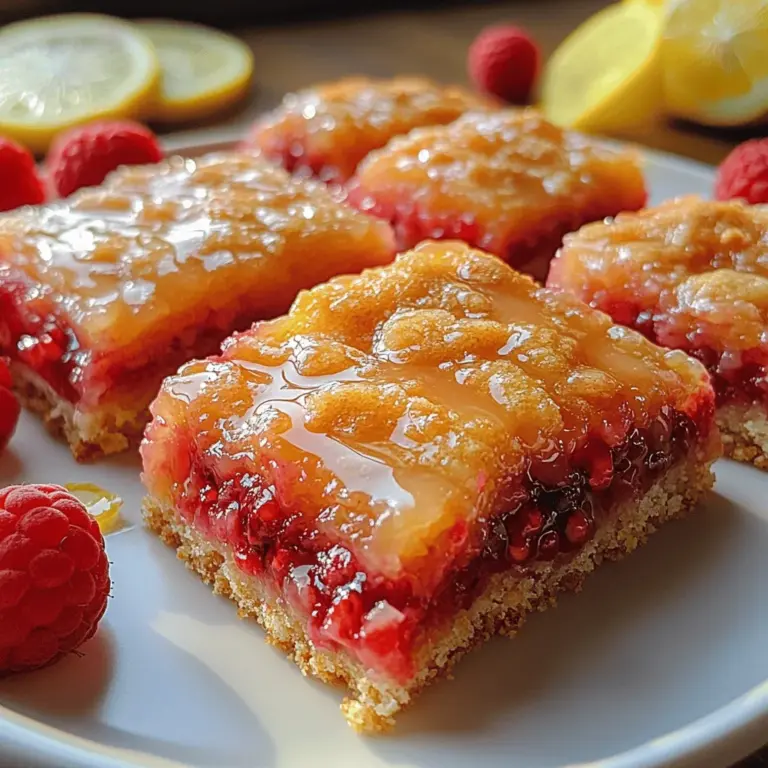
The allure of Raspberry Lemonade Bars lies not only in their delightful taste but also in their eye-catching appearance. The vibrant pink hue of the raspberry layer juxtaposed against the sunny yellow of the lemonade layer creates a feast for the eyes. Each bite offers a burst of flavor that is both refreshing and uplifting, making them a favorite summer dessert.
Seasonal ingredients play a crucial role in enhancing the taste of these bars. Fresh lemons provide a zesty brightness that elevates the overall flavor profile, while ripe raspberries add a touch of sweetness and a slight tartness that complements the lemonade perfectly. This combination of flavors captures the essence of summer, evoking memories of lazy days spent outside, sipping cold lemonade and enjoying the warmth of the sun.
Lemonade bars have gained immense popularity in summer dessert recipes due to their refreshing qualities. They offer a unique twist on traditional lemon bars by incorporating fruit flavors that add depth and dimension. The result is a dessert that is not only delicious but also feels light and satisfying, making it an ideal choice for those looking to indulge without feeling weighed down.
Ingredients Breakdown
To create the perfect Raspberry Lemonade Bars, you’ll need a few key ingredients that together, create a symphony of flavors and textures. Let’s break down what you’ll need for both the crust and the lemonade layer.
Crust Ingredients
1. Flour: The foundation of your crust, flour provides structure and helps bind the ingredients together. All-purpose flour is commonly used for this recipe due to its balanced protein content, which contributes to the crust’s texture.
2. Butter: Unsalted butter is essential for creating a rich and flavorful crust. It helps to achieve that melt-in-your-mouth texture. Be sure to use cold butter, as this will help create a flakier crust.
3. Sugar: Granulated sugar sweetens the crust and aids in browning, giving it a lovely golden hue once baked. The right amount of sugar can enhance the overall flavor without overpowering the tartness of the lemon and raspberry.
4. Vanilla Extract: A splash of vanilla extract adds depth and warmth to the crust, balancing the flavors beautifully. It’s a simple addition that elevates the overall taste of the dessert.
Lemonade Layer Ingredients
1. Fresh Lemons: The star of the lemonade layer, fresh lemons provide both juice and zest, bringing brightness and acidity to the bars. Using fresh lemons rather than bottled juice ensures a vibrant flavor that is essential to the recipe.
2. Raspberries: Fresh raspberries are crucial for this recipe. They add natural sweetness and a slight tartness that pairs perfectly with the lemon flavor. When selecting raspberries, look for plump, juicy berries with a deep color for the best taste.
3. Eggs: Eggs provide structure and help bind the lemonade layer together. They also contribute to the creamy texture that makes each bite so satisfying.
4. Sugar: Just like in the crust, sugar is used in the lemonade layer to balance out the acidity of the lemons and the tartness of the raspberries. The amount can be adjusted based on your sweetness preference.
5. Cornstarch: This ingredient helps to thicken the filling, ensuring that it sets properly and has a smooth consistency.
Optional Glaze Ingredients
To elevate your Raspberry Lemonade Bars even further, consider adding a glaze. This optional step can provide a beautiful finish and an extra layer of flavor.
1. Powdered Sugar: The main ingredient for the glaze, powdered sugar offers a sweet touch that complements the tartness of the bars. It creates a silky-smooth texture that’s easy to drizzle.
2. Lemon Juice: Fresh lemon juice adds a citrusy brightness to the glaze, tying it back to the main flavors of the dessert.
3. Milk or Cream: A small amount of milk or cream can be added to the glaze to achieve the desired consistency. It helps to create a drizzle-able texture that can be easily poured over the bars.
Step-by-Step Instructions
Now that we’ve covered the ingredients, let’s dive into the step-by-step process of making these delicious Raspberry Lemonade Bars.
Prepping the Baking Dish
Before you begin mixing your ingredients, it’s important to prepare your baking dish properly. Greasing and lining the dish will ensure that your bars come out easily and maintain their beautiful shape.
1. Select the Right Dish: A 9×9-inch square baking dish is ideal for this recipe. If you prefer thicker bars, you can use an 8×8-inch dish, but be aware that the baking time may need to be adjusted slightly.
2. Grease the Dish: Use a light coating of butter or cooking spray on the bottom and sides of the baking dish. This will help prevent sticking.
3. Line the Dish: For added convenience, line the greased dish with parchment paper, leaving some overhang on the edges. This will make it easier to lift the bars out once they’ve cooled.
Crafting the Perfect Crust
With your baking dish prepped, it’s time to make the crust. The crust is a critical component that sets the foundation for your Raspberry Lemonade Bars, providing texture and flavor.
1. Mix the Dry Ingredients: In a medium mixing bowl, combine the flour, sugar, and a pinch of salt. Whisk these ingredients together until they’re well combined.
2. Incorporate the Butter: Cut the cold, unsalted butter into small cubes and add it to the dry mixture. Using a pastry cutter or your fingers, work the butter into the flour mixture until it resembles coarse crumbs. Be careful not to overmix; you want to see small bits of butter throughout the mixture.
3. Press the Crust Into the Dish: Once the crust mixture is ready, transfer it to the prepared baking dish. Using your fingers or the bottom of a measuring cup, press the mixture evenly into the bottom of the dish. Aim for a uniform thickness to ensure even baking.
Baking Tips for Achieving the Ideal Crust Texture
Proper baking techniques are essential for achieving the perfect crust. Here are some tips to ensure your crust turns out just right:
1. Preheat Your Oven: Always preheat your oven to the specified temperature (usually around 350°F or 175°C) before placing your crust inside. This allows for even baking and helps achieve that golden-brown color.
2. Bake Until Golden: Place the crust in the preheated oven and bake for about 15-20 minutes, or until it’s lightly golden. Keep a close eye on it to prevent overbaking, as a burnt crust can ruin the overall flavor of your bars.
3. Cool Before Adding the Filling: Once the crust is baked to perfection, remove it from the oven and allow it to cool slightly before adding the lemonade layer. This will help prevent the filling from melting into the crust and creating a soggy bottom.
By following these steps, you’ll create a deliciously buttery and flaky crust that serves as the perfect base for the tart and sweet raspberry lemonade layer to come. Stay tuned for the next section, where we will dive into preparing the vibrant lemonade layer that completes these delightful bars.
Making the Lemonade Filling
To create the luscious lemonade filling for your Raspberry Lemonade Bars, start by whisking together the main ingredients: fresh lemon juice, sugar, eggs, and a touch of flour. Whisking is crucial—it not only combines the ingredients but also incorporates air into the mixture, giving it that light and fluffy texture we desire for a dessert bar. Aim for a smooth consistency without any lumps. This can take a minute or two of vigorous whisking; don’t rush this step. You want to break down the sugar completely and ensure the eggs are fully integrated, creating a beautifully cohesive filling that will bake up perfectly.
When you’ve achieved a smooth mixture, gently fold in the key ingredient: fresh raspberries. This step requires a delicate touch. You want to preserve the integrity of the raspberries, allowing them to maintain their shape and provide bursts of flavor throughout the bars. Use a spatula to carefully incorporate the raspberries into the lemon filling, ensuring they are evenly distributed without mashing them. This technique not only enhances the visual appeal of your bars but also ensures each bite is a delightful combination of lemon and raspberry.
Baking Times and Indicators for Doneness
Once your filling is ready, pour it over the pre-baked crust, spreading it evenly. The next step is to bake the bars to perfection. Preheat your oven to 350°F (175°C) if you haven’t already, and place the bars in the oven. The baking time will usually range between 20 to 25 minutes. It’s essential to keep an eye on them during the last few minutes of baking. You’ll know the bars are done when the edges are set and the center has a slight jiggle—this is a good indicator that it will firm up as it cools.
Another tip is to check for a slight golden hue on the edges and a glossy sheen on top. A toothpick inserted into the center should come out with a few moist crumbs, but not a wet batter. This precise balance ensures that your Raspberry Lemonade Bars are perfectly set, with a creamy filling that is not overbaked.
Cooling and Setting the Bars
Once you remove the bars from the oven, it’s crucial to let them cool at room temperature. This cooling step is essential as it allows the filling to set properly before moving on to refrigeration. Let them cool for about 30 minutes on a wire rack. After they have cooled, transfer the bars to the refrigerator for at least two hours, or until completely chilled. Chilling is key to achieving the right texture—this process will firm up the filling, making it easy to cut into neat squares later.
For storage, if you have leftovers (though they may not last long!), keep the bars in an airtight container in the refrigerator. They can typically stay fresh for up to five days. You can also place parchment paper between layers if stacking them, which helps prevent sticking.
Adding a Touch of Elegance with the Glaze
To elevate your Raspberry Lemonade Bars, consider adding a glaze. The glaze not only enhances the visual appeal but also adds an extra layer of flavor. A simple glaze can be made by whisking together powdered sugar and fresh lemon juice until you reach a smooth, pourable consistency. The goal is to achieve a balance: not too thick, allowing it to drizzle beautifully over the bars, and not too thin, which would run off.
Once your bars are chilled and ready to serve, drizzle the glaze over the top using a spoon or a piping bag for more precision. You can also sprinkle a few additional raspberries or lemon zest on top for an elegant presentation. When plating, cut the bars into squares or rectangles and serve them on a colorful platter, perhaps garnished with mint leaves for a pop of color.
Flavor Variations and Customizations
While the classic Raspberry Lemonade Bars are delightful, there are numerous ways to customize this recipe to suit your taste preferences. For instance, you can substitute raspberries with other berries like blueberries, blackberries, or strawberries. Each berry will lend its unique flavor profile and color to the bars.
If you’re feeling adventurous, consider adding fresh herbs like mint or basil to the filling for a refreshing twist. A teaspoon of finely chopped mint or basil can complement the citrusy lemon flavor beautifully, creating a unique and aromatic dessert.
For those following a vegan or gluten-free diet, this recipe can be easily adapted. To make it vegan, substitute the eggs with a flaxseed mixture (1 tablespoon of ground flaxseed combined with 2.5 tablespoons of water) or use a commercial egg replacer. For a gluten-free version, replace the all-purpose flour with a gluten-free flour blend or almond flour, which will still provide a lovely texture.
Nutritional Information
Raspberry Lemonade Bars not only satisfy your sweet tooth but also offer some nutritional benefits. Raspberries are packed with vitamins, fiber, and antioxidants, which can contribute to overall health. The lemon juice adds vitamin C, while the sugar content can be regulated based on personal preference.
When compared to traditional dessert options, like heavy cakes or cookies, these bars typically have fewer calories and sugars, especially if made with alternative sweeteners or reduced sugar. By using natural fruits and fresh ingredients, you create a dessert that feels indulgent but is lighter and more refreshing.
Conclusion
In summary, Raspberry Lemonade Bars are a delightful treat that encapsulates the essence of summer with their sweet and tangy flavors. The combination of a buttery crust, luscious lemon filling, and vibrant raspberries creates a dessert that is both visually appealing and refreshingly delicious. We encourage you to try this recipe and experience the delightful flavors for yourself.
Baking is not just about following a recipe; it’s about creating something special to share with friends and family. These Raspberry Lemonade Bars are perfect for gatherings, picnics, or simply as a sweet treat to enjoy on a warm day. So gather your ingredients, embrace the joy of baking, and indulge in the refreshing taste of these vibrant bars. Whether you stick to the classic recipe or explore creative variations, you’re sure to create a memorable dessert that everyone will love.