Introduction
Dulce de leche cheesecake bars are a decadent twist on a classic dessert that seamlessly combines the rich, caramel-like flavor of dulce de leche with the creamy, tangy goodness of cheesecake. This delightful dessert hails from Latin American origins, where dulce de leche, which translates to “sweet milk,” has been cherished for generations. Its popularity has spread far beyond its roots, becoming a beloved ingredient in various confections and baked goods worldwide.
The allure of dulce de leche lies not only in its unique taste but also in its luscious texture, which pairs beautifully with the smooth richness of cheesecake. Together, they create a dessert that is both indulgent and satisfying, making these cheesecake bars perfect for any occasion—be it a festive gathering, a family celebration, or simply a treat for yourself after a long day. With their easy preparation, these bars promise to deliver a show-stopping dessert that will impress your guests and delight your taste buds.
In this article, we’ll explore the intricacies of dulce de leche and its role in creating the perfect cheesecake bars. From the ingredients that form the foundation of this dessert to the detailed steps involved in its preparation, you’ll discover how to make these irresistible treats from scratch.
Understanding Dulce de Leche
Dulce de leche is a traditional Latin American confection made by slowly heating sweetened milk until it caramelizes and thickens, resulting in a creamy, smooth sauce that boasts a deep golden-brown color. The process of making dulce de leche requires patience, as the milk must be stirred constantly to prevent burning and to achieve that perfect velvety consistency. While store-bought versions are readily available, making it at home can be a rewarding experience that allows you to control the sweetness and creaminess of the final product.
One of the most appealing aspects of dulce de leche is its versatility. Beyond being a key ingredient in decadent desserts like cheesecake, it can be used to elevate a wide array of dishes. Whether drizzled over ice cream, used as a filling for pastries, or spread on toast, dulce de leche adds a rich, sweet flavor that enhances any treat. In addition, it can be incorporated into savory dishes, adding depth and complexity to sauces and glazes.
Dulce de leche holds a special place in the hearts of many cultures, particularly in countries like Argentina, Mexico, and Spain. It is often associated with childhood memories, family gatherings, and festive celebrations, symbolizing comfort and joy. Incorporating dulce de leche into your baking not only introduces a delicious flavor but also pays homage to its cultural significance, making your dessert even more meaningful.
Ingredients Breakdown
Creating the ultimate dulce de leche cheesecake bars requires a selection of high-quality ingredients that contribute to the flavors and textures of this indulgent treat. Let’s take a closer look at what you’ll need:
For the Crust
– Graham Cracker Crumbs: The base of these cheesecake bars is made from graham cracker crumbs, which lend a subtle sweetness and a delightful crunch. The flavor profile of graham crackers, with their hints of honey and cinnamon, complements the rich cheesecake filling perfectly.
– Butter: Unsalted butter is crucial for binding the crumbs together and creating a solid base. It adds richness and moisture to the crust, ensuring it holds its shape during baking and slicing.
– Sugar: A small amount of granulated sugar is added to the crust mixture to enhance the sweetness and balance the flavors. It helps to create a slight caramelization when baked, adding an additional layer of flavor to the crust.
For the Cheesecake Filling
– Cream Cheese: The star ingredient of the cheesecake filling is cream cheese, which provides the necessary creaminess and tang. It’s essential to use full-fat cream cheese for the best texture; low-fat varieties may result in a less satisfying end product.
– Dulce de Leche: The sweetness and depth of flavor in the filling come from dulce de leche. Its caramel-like taste enriches the cheesecake, making it indulgent and irresistible. You can use homemade or store-bought dulce de leche, depending on your preference and time constraints.
– Optional Ingredients: Some recipes include all-purpose flour, which acts as a thickening agent, helping the cheesecake to set properly. Additionally, you may incorporate eggs, which provide structure and stability to the filling, ensuring a smooth texture once baked.
For the Topping
– Drizzle of Dulce de Leche: To finish off these cheesecake bars, a generous drizzle of dulce de leche on top not only enhances the presentation but also amplifies the overall flavor. This finishing touch creates an inviting visual that will entice anyone who lays eyes on your dessert.
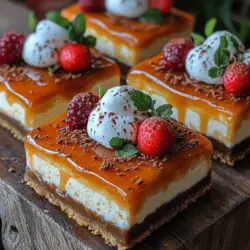
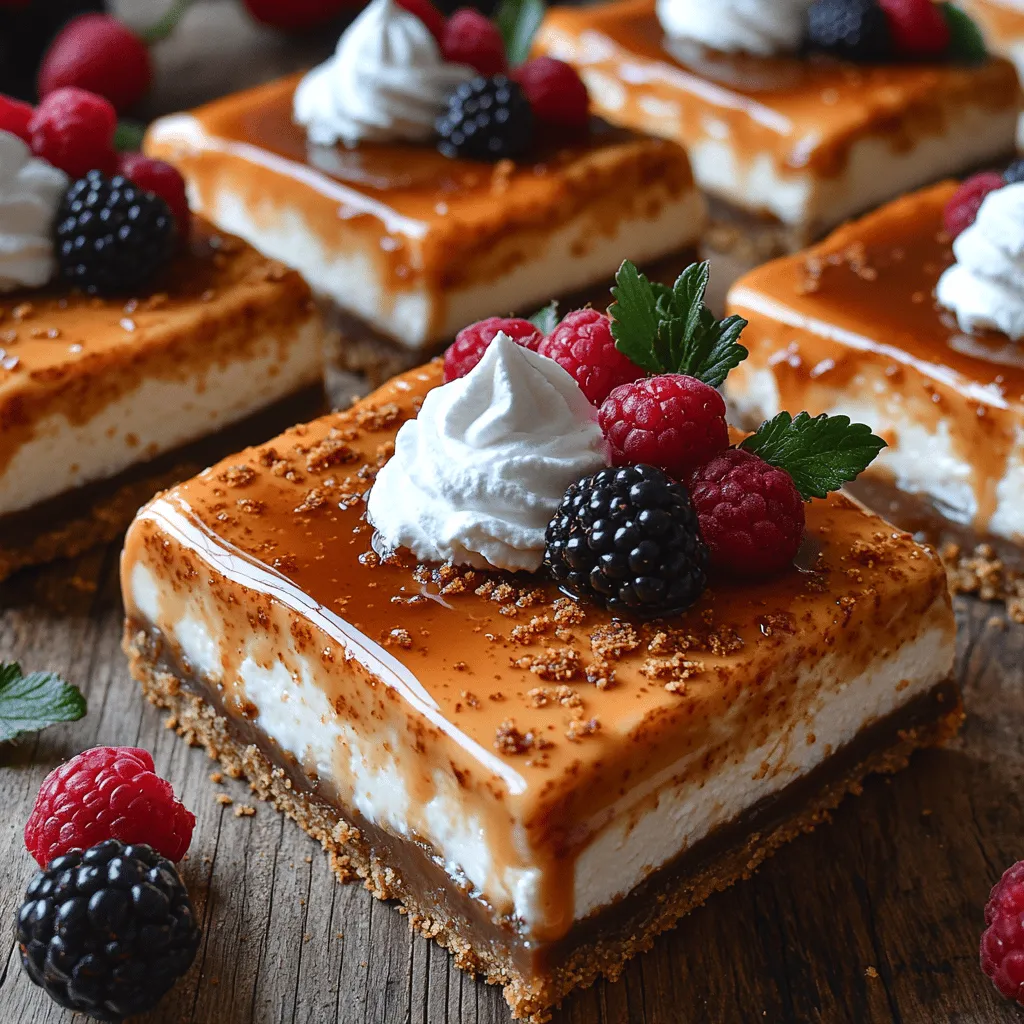
– Whipped Cream and Fresh Berries: For added flavor and aesthetics, consider topping your cheesecake bars with a dollop of whipped cream and a handful of fresh berries. The lightness of the whipped cream and the tartness of the berries provide a refreshing contrast to the sweetness of the cheesecake, creating a balanced dessert experience.
Preparation Steps in Detail
Preheating the Oven
Before diving into the actual preparation of the cheesecake bars, it’s crucial to preheat your oven to the appropriate temperature, typically around 325°F (163°C). Preheating the oven ensures even cooking and helps the cheesecake fill set properly. A properly heated oven will help to achieve a smooth, creamy texture without the risk of cracks forming on the surface of the cheesecake. While the oven is warming, you can prepare the crust and filling, making efficient use of your time.
With the stage set and the ingredients gathered, you are well on your way to creating an unforgettable dessert that will satisfy your sweet tooth and impress your guests. The following sections will guide you through the remaining steps of this delightful recipe, ensuring that your dulce de leche cheesecake bars turn out perfectly every time.
Making the Crust
The crust is the foundation of your Dulce de Leche Cheesecake Bars, providing a deliciously crunchy contrast to the creamy filling. It’s crucial to get the texture just right, as this will enhance the overall experience of the dessert.
Step-by-Step Instructions for Preparing the Crust
1. Gather Ingredients: You will need 1 ½ cups of graham cracker crumbs, ½ cup of unsalted butter (melted), and ¼ cup of granulated sugar.
2. Preheat the Oven: Set your oven to 350°F (175°C). This ensures that the crust will bake evenly and develop a golden color.
3. Mix Ingredients: In a medium mixing bowl, combine the graham cracker crumbs, melted butter, and sugar. Stir until the mixture resembles wet sand.
4. Press into Pan: Line a 9×9-inch baking pan with parchment paper for easy removal. Pour the crumb mixture into the pan and use the back of a measuring cup or your fingers to firmly press the mixture down into an even layer across the bottom of the pan.
5. Bake the Crust: Place the pan in the preheated oven and bake for about 8-10 minutes, or until lightly browned. Remove from the oven and let cool slightly while you prepare the cheesecake filling.
Tips on Achieving the Perfect Crust Texture
– Use Fresh Graham Crackers: For the best flavor, use fresh graham crackers, as stale ones can lead to a less-than-ideal texture.
– Don’t Overmix: When combining the crust ingredients, mix just until combined. Overmixing can lead to a tough crust.
– Ensure Firm Packing: Press the crumb mixture firmly into the pan to prevent it from crumbling apart when you cut the bars later.
Preparing the Cheesecake Filling
Creating the cheesecake filling is where the magic happens. The combination of cream cheese, dulce de leche, and other ingredients results in a rich, velvety texture that pairs beautifully with the crust.
Detailed Instructions on Mixing Ingredients for a Smooth Filling
1. Ingredients: Gather 16 ounces of cream cheese (softened), 1 cup of dulce de leche, ½ cup of granulated sugar, and 2 large eggs.
2. Beat the Cream Cheese: In a large mixing bowl, use an electric mixer to beat the softened cream cheese until smooth and creamy, about 2-3 minutes.
3. Add the Dulce de Leche: Gradually add the dulce de leche to the cream cheese, mixing until fully combined and smooth.
4. Incorporate Sugar: Add the granulated sugar to the mixture and continue to beat until it is fully incorporated.
5. Add Eggs Slowly: Crack the eggs into a separate bowl and add them one at a time to the cream cheese mixture. Beat gently after each addition until just combined. This step is crucial as adding eggs too quickly can introduce air pockets into the filling, which may cause the cheesecake to crack during baking.
Baking the Cheesecake
Once the filling is ready, it’s time to bake the cheesecake. The goal is to achieve a perfectly set center while avoiding overbaking, which can lead to a dry texture.
Tips for Knowing When the Cheesecake is Perfectly Baked
– Watch for the Edges: The edges should appear set, while the center will still have a slight jiggle when you gently shake the pan.
– Cooling in the Oven: Turn off the oven and leave the cheesecake inside for an additional 15-20 minutes. This gentle cooling helps prevent cracks from forming.
Cooling and Setting the Cheesecake Bars
After baking, the cooling process is just as crucial as the baking itself.
– Let It Cool: Remove the cheesecake from the oven and allow it to cool in the pan on a wire rack for about 30 minutes.
– Chill in the Refrigerator: Once cooled to room temperature, transfer the cheesecake to the refrigerator and chill for at least 4 hours, or preferably overnight. Chilling allows the flavors to mingle and the cheesecake to set properly, resulting in a creamy texture that is easy to slice.
Serving Suggestions
When it comes to serving your Dulce de Leche Cheesecake Bars, presentation is key. Here are some creative ideas to elevate your dessert:
– Garnish: Drizzle additional dulce de leche over the top for an extra touch of sweetness. You can also sprinkle some crushed graham crackers or a light dusting of cocoa powder for added texture.
– Pairings: Serve with fresh berries, such as strawberries or raspberries, which provide a tart contrast to the sweetness of the cheesecake. A dollop of whipped cream can also enhance the experience.
– Cutting the Bars: To achieve clean cuts, use a sharp knife dipped in warm water. Wipe the knife after each cut to maintain neat edges, making your dessert visually appealing for gatherings.
Variations and Customizations
Feel free to experiment with this recipe to create your own unique version:
– Flavor Variations: Incorporate melted chocolate into the filling for a chocolate dulce de leche cheesecake. Alternatively, add a swirl of fruit puree for a refreshing twist.
– Gluten-Free Options: Swap out traditional graham crackers for gluten-free alternatives. There are many brands available that offer gluten-free graham cracker crumbs without sacrificing flavor.
– Dairy-Free Alternatives: For a dairy-free version, substitute cream cheese with vegan cream cheese and use coconut cream in place of dulce de leche. Ensure that all other ingredients are dairy-free.
Storing Leftovers
To keep your cheesecake bars fresh:
– Refrigeration: Store any leftover bars in an airtight container in the refrigerator. They can last up to 5 days without losing flavor or texture.
– Freezing: If you want to extend their shelf life, you can freeze the cheesecake bars. Wrap them tightly in plastic wrap and then in aluminum foil. They can be stored in the freezer for up to 3 months. When ready to enjoy, thaw them in the refrigerator overnight before serving.
Conclusion
Dulce de Leche Cheesecake Bars are a delightful combination of rich, creamy filling and a crunchy, buttery crust, making them a must-try dessert for any occasion. Their simplicity in preparation allows both novice and experienced bakers to create something truly special. The joy of making these bars lies not just in the process but in the satisfaction of sharing them with friends and family.
Indulge in the delightful experience of crafting your own Dulce de Leche Cheesecake Bars at home, and revel in the praises that will surely follow from those lucky enough to enjoy your creation. Whether for a special occasion or simply to satisfy a sweet tooth, these bars will leave a lasting impression on anyone who takes a bite.