There’s something undeniably comforting about homemade bread, and rolls, in particular, hold a special place in our culinary hearts. Imagine the aroma wafting through your kitchen as you bake a batch of buttery garlic herb rolls; it’s the kind of experience that instantly makes a house feel like a home. These rolls are not just any side dish; they are a versatile addition to a variety of meals, from hearty stews and soups to elegant dinners and festive gatherings. With their fluffy texture and rich flavor, Buttery Garlic Herb Rolls elevate any dining experience and leave a lasting impression on your guests.
What sets these rolls apart is the unique blend of flavors that comes from the harmonious marriage of garlic and fresh herbs. Each bite bursts with the savory notes of garlic, complemented perfectly by the freshness of herbs like parsley or thyme. Whether you serve them alongside a robust pasta dish or as an appetizer with a dipping sauce, these rolls promise to delight your taste buds and enhance your meal.
Understanding the Basics of Bread Making
Before we dive into creating these delightful rolls, it’s essential to understand the fundamental elements that contribute to successful bread making. Making bread is both an art and a science, and knowing the role of each ingredient can help you achieve the perfect result.
The Role of Flour
Flour is the backbone of any bread recipe, and its type can significantly impact the texture of your rolls. The most common choice for bread-making is all-purpose flour, which provides a good balance of protein content that helps develop gluten. Gluten is critical for creating the structure and chewiness of the rolls. If you’re looking for a lighter texture, you might also consider using bread flour, which has a higher protein content. When measuring flour, it’s essential to do it correctly. Spoon the flour into your measuring cup and level it off with a knife to ensure accuracy; packing it down can lead to overly dense rolls.
The Importance of Yeast
Yeast is the magical ingredient that causes bread to rise. For our Buttery Garlic Herb Rolls, we use instant yeast, which is favored for its ease of use and faster activation compared to active dry yeast. Instant yeast can be mixed directly into the dry ingredients without needing to be activated first, making the process more straightforward. It works by consuming the sugars in the dough and producing carbon dioxide, which creates those delightful air pockets that give the rolls their fluffy texture.
The Function of Sugar and Salt
Sugar serves multiple purposes in bread-making. It not only adds sweetness but also feeds the yeast, promoting its growth and improving the overall rise of the dough. Salt, on the other hand, is crucial for flavor and helps regulate yeast activity. Too much salt can inhibit yeast growth, while too little can lead to overly rapid fermentation. Striking the right balance is key to achieving the perfect dough.
Overview of the Dough-Making Process
The process of making dough involves several key steps: mixing, kneading, and rising. First, you mix the dry ingredients (flour, yeast, salt, and sugar) together to ensure even distribution. Next, you’ll combine the wet ingredients, which typically include milk, butter, and sometimes eggs. Once mixed, the dough is kneaded—this is where the gluten develops, giving the rolls their structure. After kneading, the dough is left to rise in a warm environment, allowing it to double in size. This process is vital for achieving light and airy rolls.
Key Ingredients in Buttery Garlic Herb Rolls
Now that we’ve covered the basics of bread-making, let’s take a closer look at the specific ingredients that make our Buttery Garlic Herb Rolls so special.
All-Purpose Flour
All-purpose flour is the go-to choice for our rolls due to its versatility. It contains a moderate amount of protein, which helps create the desired texture without being too dense. When measuring flour, remember to use the spoon and level method to ensure you don’t end up with too much, which could lead to dry rolls.
Instant Yeast
As previously mentioned, we use instant yeast for this recipe. Its ability to work quickly allows for a more efficient bread-making process, making it ideal for busy home cooks. Instant yeast also has a longer shelf life than active dry yeast, making it a reliable pantry staple.
Warm Milk
The temperature of the milk is crucial for activating the yeast. Ideally, the milk should be warm—about 110°F (43°C). This temperature is warm enough to awaken the yeast without being so hot that it kills it. You can easily achieve this by warming the milk gently in a saucepan or microwave. Always test it with your finger; it should feel warm, not scalding.
Unsalted Butter
Using unsalted butter is essential in this recipe, as it allows you to control the salt content of the rolls. Butter adds richness and flavor to the dough, contributing to a tender crumb. Make sure to melt the butter before incorporating it into the mixture for even distribution.
Fresh Herbs
Fresh herbs can make a significant difference in flavor compared to their dried counterparts. For our Buttery Garlic Herb Rolls, parsley, thyme, or rosemary can be used to create a fragrant dough. If you choose to use dried herbs instead, remember that they are more potent, so you should use about one-third of the amount called for fresh herbs.
Step-by-Step Instructions for Making Buttery Garlic Herb Rolls
Now that we have our ingredients ready and a fundamental understanding of bread-making, let’s delve into the step-by-step process for creating these irresistible rolls.
Mixing the Dry Ingredients
1. Preparation: Begin by gathering your dry ingredients: all-purpose flour, instant yeast, sugar, and salt. In a large mixing bowl, whisk together 4 cups of all-purpose flour, 2 teaspoons of instant yeast, 1 tablespoon of sugar, and 1 teaspoon of salt. Whisking these together ensures that the yeast and salt are evenly distributed throughout the flour, setting the stage for a successful rise.
Combining Wet Ingredients
2. Heating the Milk: In a small saucepan, gently heat 1 cup of milk until it reaches approximately 110°F (43°C). Remember to stir it frequently to prevent it from scorching. If you don’t have a thermometer, a quick test with your finger should indicate that it feels warm but not hot.
3. Melting the Butter: While the milk is warming, melt 4 tablespoons of unsalted butter in a separate bowl or in the microwave. Allow it to cool slightly before adding it to the warm milk. This step is crucial; if the butter is too hot, it can kill the yeast when combined.
4. Mixing Wet Ingredients: Once the butter has cooled, mix the melted butter with the warm milk in a mixing bowl. If you’re using fresh herbs, chop them finely and add them to the milk and butter mixture to infuse the flavors.
5. Combining Wet and Dry: Pour the wet ingredients into the bowl with the dry ingredients. Use a spatula or wooden spoon to combine everything until it forms a shaggy dough. Ensure that all the flour is incorporated, and do not worry if the dough looks a bit sticky at this stage.
As we progress through the recipe, the next steps will involve kneading the dough, allowing it to rise, and shaping it into rolls. Each phase is essential for developing the flavor and texture that will make your Buttery Garlic Herb Rolls the perfect accompaniment to any meal. Stay tuned for the continuation of this delightful recipe that will surely become a favorite in your household.
Forming the Dough
Once you’ve prepared your ingredients, it’s time to bring them together and form a dough that will yield those soft, buttery garlic herb rolls you crave. Start by combining your dry ingredients—flour, salt, sugar, garlic powder, and any herbs you’ve chosen—in a large mixing bowl. Creating a well in the center, add your warm milk and melted butter. Gently stir the mixture with a wooden spoon or spatula until it begins to come together.
To incorporate the garlic powder and herbs effectively, use a folding technique to avoid clumping. As you mix, ensure that the dry ingredients are evenly distributed throughout the dough. This will enhance the flavor of each roll. Once the mixture is too stiff to stir, use your hands to combine everything into a shaggy mass. The warmth from your hands will help activate the butter and dissolve any remaining dry bits.
Kneading the Dough
Kneading is an essential step in developing the gluten structure of your dough, which will give your rolls their desirable chewy texture. Turn the dough out onto a lightly floured surface and begin kneading by pressing down with the heel of your hand, folding it over, and repeating the process. Knead the dough for about 8-10 minutes, or until it becomes smooth and elastic. If the dough sticks to your hands, sprinkle a small amount of flour as needed, but be careful not to over-flour, as this can lead to dry rolls.
To test if the dough is ready, perform the “windowpane test”: take a small piece of dough and stretch it gently. If it forms a thin, translucent membrane without tearing, it’s ready for the first rise. This step is crucial for ensuring that your rolls rise beautifully and maintain their shape during baking.
First Rise: Importance and Techniques
The first rise, or fermentation, is crucial for developing the flavors and texture of your rolls. Place your kneaded dough in a lightly greased bowl, cover it with a damp cloth or plastic wrap, and let it rise in a warm, draft-free area. Ideal rising conditions are around 75-80°F (24-27°C). If your kitchen is on the cooler side, you can create a warm environment by placing the bowl in the oven with just the light on or near a heater.
The dough should rise until it has doubled in size, which typically takes about 1 to 2 hours. To check if it’s ready, gently press a finger into the dough; if the indentation remains, it’s time to move on to shaping. This step is essential because the yeast produces carbon dioxide, creating air pockets that will make your rolls light and fluffy.
Shaping the Rolls
Once your dough has risen sufficiently, it’s time to shape it into rolls. Begin by punching down the dough to release the gases formed during the first rise. Turn the dough out onto a lightly floured surface and divide it into equal portions, usually about 12-16 pieces, depending on your desired roll size.
To shape each piece, take one piece of dough and gently stretch it into a smooth ball by tucking the edges underneath. Place the shaped roll on a greased baking sheet or in a greased baking dish, ensuring they are spaced evenly apart. Repeat this process for the remaining pieces of dough.
Second Rise: Importance of Patience
After shaping the rolls, cover them again with a damp cloth or plastic wrap and allow them to rise for another 30-45 minutes. This second rise is crucial for achieving a light and airy texture. During this time, the rolls will puff up and fill with air, making them tender and fluffy when baked.
You’ll know they are ready when they have noticeably increased in size and spring back gently when touched. This patience pays off, as rushing the second rise can lead to dense, disappointing rolls.
Preparing for Baking
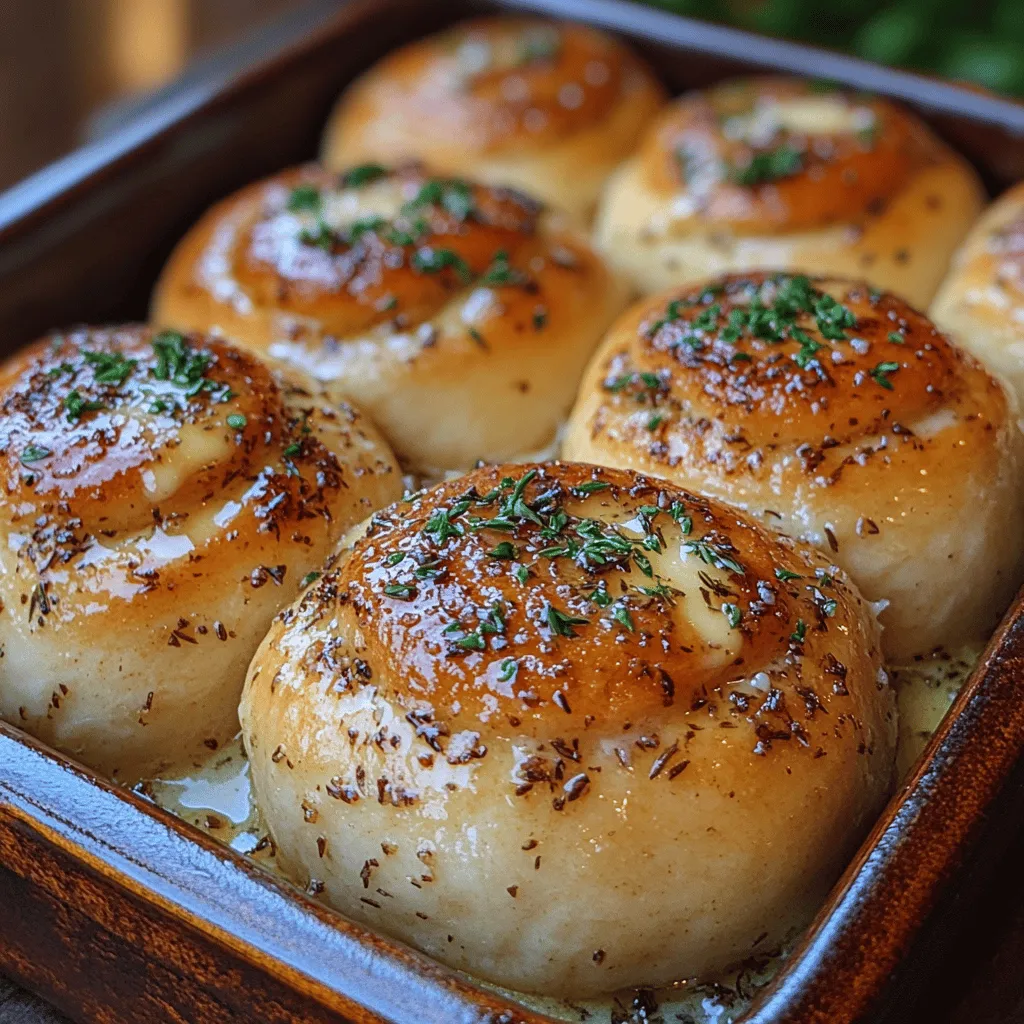
Before baking, it’s essential to prepare your rolls for the oven. Brush the tops with melted butter to create a rich, golden crust and enhance flavor. You can also sprinkle additional herbs or garlic powder on top for a burst of flavor. This step not only adds a delicious finishing touch but also provides an appealing shine to the rolls.
Baking the Rolls
Preheat your oven to 375°F (190°C) while your rolls complete their second rise. Bake the rolls in your preheated oven for 15-20 minutes, or until they are golden brown and sound hollow when tapped on the bottom. The internal temperature for perfectly baked rolls should reach about 190°F (88°C).
As the rolls bake, the aroma of garlic and herbs will fill your kitchen, tantalizing everyone nearby. Keep an eye on them in the last few minutes of baking to ensure they don’t over-brown. Once baked, remove them from the oven and brush with a little more melted butter for an extra touch of richness.
Serving Suggestions for Buttery Garlic Herb Rolls
These buttery garlic herb rolls are incredibly versatile and can complement a wide variety of dishes. Here are some delightful pairings:
1. Italian Cuisine: Serve these rolls alongside pasta dishes such as spaghetti or lasagna. Their fluffy texture makes them perfect for mopping up sauces.
2. American Classics: Pair with grilled meats, barbecue, or hearty soups for a comforting meal. They can also be used as a side to a classic Thanksgiving dinner.
3. Creative Leftover Uses: If you have any leftover rolls, consider transforming them into sliders or mini sandwiches. Slice them in half and fill them with your favorite meats, cheeses, or vegetables. You can also use them as a base for garlic bread—just slice, spread with butter, and toast until golden.
Nutritional Information
Homemade rolls offer a balance of indulgence and nutrition. Each roll contains approximately 150 calories, primarily from carbohydrates and fats, with essential nutrients from the herbs and garlic. Garlic, in particular, is known for its health benefits, including anti-inflammatory properties and potential heart health support.
Using high-quality ingredients like whole wheat flour can increase the fiber content, making these rolls a more wholesome choice. By enjoying these rolls in moderation and incorporating them into a balanced meal, you can savor their deliciousness without guilt.
Conclusion
Making Buttery Garlic Herb Rolls is not just about baking; it’s an experience that brings warmth and comfort to your kitchen. The process, from kneading the dough to watching it rise, is rewarding, culminating in rolls that are fluffy, flavorful, and utterly satisfying.
Don’t hesitate to experiment with your own variations by adding different herbs or spices to suit your tastes. Whether served as a side dish, transformed into something new, or enjoyed straight from the oven, these rolls are sure to be a hit at your next meal. Embrace the joy of homemade baking and share these delightful creations with family and friends—they’re bound to become a beloved staple in your home.