Introduction
Shrimp has long been celebrated as a versatile and delectable ingredient in various cuisines around the globe. Its delicate flavor and firm texture make it an ideal centerpiece for an array of dishes, from classic shrimp cocktails to sumptuous seafood pasta. In this recipe, we take shrimp to delightful new heights by crafting Crispy Shrimp Balls, a dish that marries the savory essence of shrimp with a satisfying crunch that is simply irresistible. Whether served as an appetizer at your next dinner party or enjoyed as a quick snack, these shrimp balls are sure to impress both family and friends.
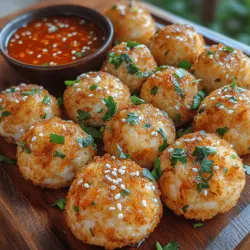
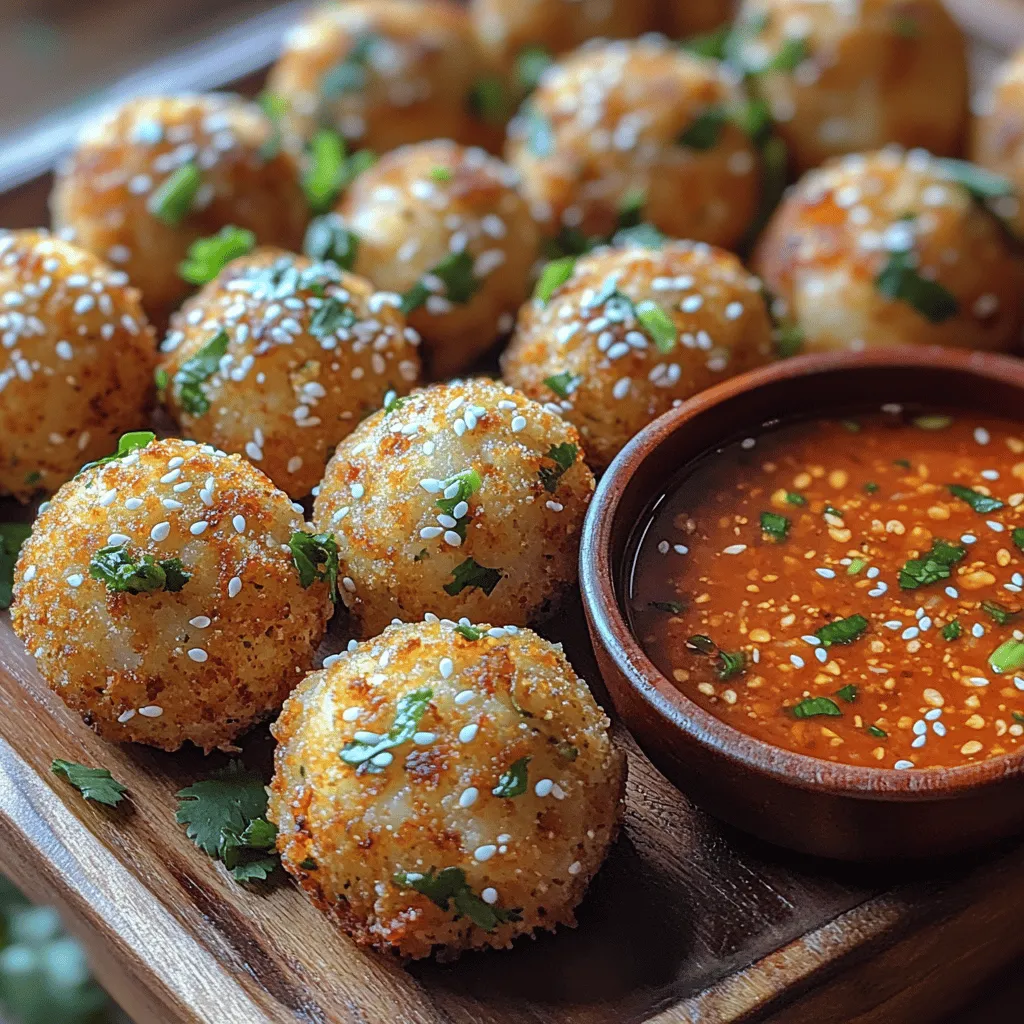
What truly sets these crispy shrimp balls apart is their pairing with a vibrant and tangy sweet chili sauce. This sauce, with its perfect balance of sweetness and heat, complements the savory shrimp flavor while enhancing the overall dining experience. The combination of crispy golden-brown morsels and the zesty dip creates a memorable dish that will leave everyone reaching for more.
Understanding the Ingredients
The Star of the Show: Shrimp
At the heart of this recipe lies shrimp, the star ingredient that provides both flavor and texture. Not only is shrimp delicious, but it also boasts several nutritional benefits that make it a popular choice among health-conscious eaters. Shrimp is low in calories and high in protein, making it an excellent source of lean protein for those looking to maintain a healthy diet. Additionally, shrimp is rich in essential nutrients such as vitamin B12, selenium, and omega-3 fatty acids, all of which contribute to overall health and well-being.
When selecting shrimp for this recipe, freshness is key. Opt for high-quality, wild-caught shrimp when possible, as they typically have superior flavor and texture compared to farmed varieties. Furthermore, make sure to choose shrimp that are peeled and deveined to streamline the prep process.
Essential Supporting Ingredients
While shrimp may be the star of the dish, the supporting cast of ingredients plays a crucial role in achieving the perfect flavor and texture of our crispy shrimp balls.
– Breadcrumbs: These tiny morsels are essential for delivering the delightful crunch that makes these shrimp balls so appealing. Coating the shrimp balls in breadcrumbs not only adds texture but also helps create a golden-brown crust during frying. For an extra layer of flavor, consider using panko breadcrumbs, which are lighter and crispier than standard breadcrumbs.
– Parmesan Cheese: Adding grated Parmesan cheese to the shrimp mixture not only enhances the flavor profile but also contributes to the binding properties of the mixture. The nutty and salty notes of Parmesan elevate the overall taste, making each bite even more satisfying.
– Fresh Herbs and Aromatics: To infuse the shrimp balls with additional flavor, we incorporate fresh herbs and aromatics such as garlic, green onion, and ginger. Garlic adds a savory depth, while green onions contribute a subtle onion flavor and a touch of freshness. Ginger brings a hint of warmth and spice, rounding out the flavor profile beautifully. Fresh herbs not only enhance the taste but also bring vibrant color to the dish.
The Importance of Quality Ingredients
When it comes to cooking, the quality of your ingredients can make or break a dish. For the best results with your crispy shrimp balls, strive to use the freshest and highest-quality ingredients available. Fresh shrimp, high-quality breadcrumbs, and flavorful herbs and spices will ensure that your dish not only tastes amazing but also stands out in terms of presentation. Investing a little extra effort in sourcing quality ingredients will yield a dish that is both visually stunning and delicious.
Preparing the Shrimp Balls
Step 1: Prepping the Shrimp
To begin crafting our crispy shrimp balls, we need to prepare the shrimp properly. If you’ve purchased whole shrimp, the first step is to peel and devein them. This process involves removing the shell and the dark vein that runs along the back of the shrimp. It may seem daunting, but it’s a straightforward task with a bit of practice. If you prefer convenience, feel free to buy pre-peeled and deveined shrimp from your local fish market or grocery store.
Once you have your shrimp ready, it’s time to chop them. The goal is to achieve a coarse texture that will hold together well while still providing a bit of bite in each shrimp ball. Using a sharp knife, chop the shrimp into small pieces, or for a quicker method, pulse the shrimp in a food processor. Be sure not to over-process; you want to retain some texture rather than turning the shrimp into a paste.
Step 2: Combining the Mixture
In a mixing bowl, combine the chopped shrimp with breadcrumbs, grated Parmesan cheese, minced garlic, chopped green onions, and grated ginger. Each ingredient contributes to the flavor and texture of the shrimp balls. The breadcrumbs act as a binder that helps hold everything together, while the cheese adds richness.
To ensure the mixture is well combined, use your hands to gently mix the ingredients. This not only allows for better distribution of flavors but also helps you gauge the texture of the mixture. If it feels too dry, consider adding a touch of egg to help bind the ingredients together more effectively. Conversely, if the mixture is too wet, adding more breadcrumbs can help achieve the right consistency.
Step 3: Shaping the Shrimp Balls
Once your shrimp mixture is ready, it’s time to shape the balls. This step is crucial for achieving uniformity in size and ensuring even cooking. Using your hands, take a small amount of the mixture and roll it into a ball about the size of a golf ball. Aim for consistency, as this will help all the shrimp balls cook evenly.
After shaping the shrimp balls, it’s important to roll them in breadcrumbs. This final coating not only adds an extra layer of crunch but also provides a beautiful golden-brown color when fried. Make sure each shrimp ball is thoroughly coated in breadcrumbs before moving on to the cooking stage.
Step 4: Cooking Techniques for Perfectly Fried Shrimp Balls
The cooking method is key to achieving perfectly crispy shrimp balls. While deep frying is the traditional approach, you can also pan-fry or bake them for a healthier option. Each cooking method has its benefits, so choose the one that suits your preferences.
For deep frying, heat oil in a deep pot or fryer to a temperature of around 350°F (175°C). Carefully drop the shrimp balls into the hot oil, cooking in batches to avoid overcrowding. Fry until they are golden brown and cooked through, which will take approximately 3-4 minutes. Use a slotted spoon to remove the shrimp balls from the oil, and drain them on paper towels to remove excess oil.
If you prefer a healthier method, you can pan-fry the shrimp balls in a skillet with a small amount of oil or bake them in a preheated oven at 400°F (200°C) for about 15-20 minutes, flipping halfway through for even crispiness.
No matter which cooking method you choose, the result will be delicious crispy shrimp balls that are bursting with flavor and ready to be paired with the vibrant sweet chili sauce. Stay tuned for the next part of the recipe, where we’ll dive into creating the perfect sweet chili sauce to complete this delightful dish.
Mastering the Frying Process for Crispy Shrimp Balls
Frying shrimp balls to golden perfection is an art that requires attention to detail. The frying process is crucial for achieving that desired crispy texture while keeping the inside succulent and flavorful. It all starts with the right oil and temperature.
Importance of Oil Temperature for Crispy Texture
The oil temperature plays a pivotal role in the frying process. Ideally, you want the oil to be between 350°F to 375°F (175°C to 190°C). If the oil is too cool, the shrimp balls will absorb excess oil and become greasy rather than crispy. Conversely, if the oil is too hot, the outer layer will brown too quickly while the interior remains undercooked. A reliable way to check the temperature is to use a kitchen thermometer, or you can drop a small piece of bread into the oil; if it sizzles and browns in about 60 seconds, the oil is ready for frying.
Tips on Frying in Batches for Even Cooking
To ensure that each shrimp ball is cooked evenly, fry them in batches. Overcrowding the pan can significantly lower the oil’s temperature, leading to uneven cooking and a soggy result. Depending on the size of your frying vessel, aim to fry about 4 to 6 shrimp balls at a time. This approach not only helps maintain the proper temperature but also allows you to monitor each ball closely. Remember to keep an eye on the frying time, which typically ranges from 3 to 4 minutes per batch, or until they achieve a lovely golden brown color.
Visual Cues for Knowing When the Shrimp Balls Are Done
Knowing when your shrimp balls are perfectly cooked is essential for the best taste and texture. Look for a rich golden-brown exterior, which indicates that the shrimp balls have developed a crispy crust. Additionally, if you insert a thermometer into the center of one, it should read at least 145°F (63°C) to ensure the shrimp is fully cooked. Once done, carefully remove the shrimp balls from the oil and place them on a plate lined with paper towels to absorb any excess oil.
Alternative Cooking Methods
If you prefer a healthier option, consider baking or air frying your shrimp balls. For baking, preheat your oven to 400°F (200°C), place the shrimp balls on a lined baking sheet, and spray them lightly with cooking oil. Bake for about 15 to 20 minutes, flipping halfway through, until they are golden and cooked through. Air frying is another excellent method; preheat your air fryer to 375°F (190°C) and cook the shrimp balls for about 10 to 12 minutes, shaking the basket halfway through for even cooking.
Crafting the Sweet Chili Sauce
No shrimp ball dish is complete without a delectable sweet chili sauce to accompany it. This sauce is the perfect balance of sweetness and acidity, adding a delightful flavor dimension to the crispy bites.
Ingredients and Their Roles in the Sauce
To make a vibrant sweet chili sauce, you will need:
– 1/2 cup sugar: Provides sweetness and helps create a syrupy texture.
– 1/2 cup white vinegar: Adds acidity and balances the sweetness.
– 1 tablespoon soy sauce: Enhances the umami flavor.
– 1 tablespoon minced garlic: Contributes depth and a savory touch.
– 1 tablespoon chili flakes: Adds heat and flavor.
– Water: To adjust the consistency of the sauce.
Each ingredient plays a vital role in creating a sauce that is not overly sweet but rather a harmonious blend of flavors.
The Balance of Sweetness and Acidity
Finding the right balance between sweetness and acidity is key to a successful sweet chili sauce. Taste the sauce as you prepare it and adjust the sugar or vinegar to your liking. If you prefer a spicier kick, feel free to increase the amount of chili flakes or even add a dash of hot sauce for extra heat.
Step-by-Step Guide to Preparing the Sauce
1. In a small saucepan, combine the sugar, vinegar, soy sauce, minced garlic, and chili flakes.
2. Add 1/4 cup of water to the mixture and stir well.
3. Heat the saucepan over medium heat, stirring until the sugar dissolves completely.
4. Once the mixture comes to a boil, reduce the heat and let it simmer for about 5-7 minutes, or until it thickens slightly.
5. Remove from heat and allow the sauce to cool. It will thicken more as it cools.
Tips for Adjusting Flavors to Personal Preference
Feel free to experiment with the sauce’s flavor profile. If you prefer a thicker sauce, let it simmer longer. For a more pronounced garlic flavor, add more minced garlic or even a splash of garlic powder. If you enjoy a tangy twist, a squeeze of lime juice can brighten the sauce beautifully.
Importance of Garnishes
Garnishes like sesame seeds and fresh cilantro not only enhance the visual appeal of your dish but also contribute additional flavors. Sprinkle toasted sesame seeds over the shrimp balls just before serving for a nutty crunch, and add chopped cilantro for a fresh, herbal note that complements the dish.
Serving Suggestions
Presentation is key when serving crispy shrimp balls with sweet chili sauce. Here are some creative ideas to elevate your appetizer platter.
Presentation Ideas for a Stunning Appetizer Platter
Arrange the shrimp balls on a large serving platter, leaving space in the center for a small bowl of sweet chili sauce for dipping. You can also place the sauce in individual ramekins for a more personal touch. Garnish the platter with lime wedges, fresh herbs, and colorful sliced vegetables like bell peppers and cucumbers to create a vibrant display.
Pairing Options with Beverages or Side Dishes
These shrimp balls pair wonderfully with a variety of beverages. Consider serving them alongside a chilled white wine, a light beer, or even a refreshing mocktail made with lime and mint. For side dishes, a simple green salad or a side of rice can complement the shrimp balls and make for a more filling meal.
Creative Ways to Use Leftover Shrimp Balls
If you find yourself with leftover shrimp balls, don’t fret. They can be incorporated into various dishes. Toss them into a fresh salad for added protein, or use them as a topping for rice bowls along with steamed vegetables. You can even reheat them in an air fryer for a quick snack that retains its crispy texture.
Nutritional Information
Understanding the nutritional profile of your dish can help you make informed choices, especially if you’re considering dietary restrictions.
Analysis of the Dish’s Nutritional Profile
A serving of crispy shrimp balls (approximately 3-4 pieces) typically contains:
– Calories: 250-300
– Protein: 15-20g
– Fat: 10-15g
– Carbohydrates: 20-25g
This nutritional information can vary based on the specific ingredients used and cooking methods.
Overview of Calories, Protein, Fats, and Carbohydrates
Shrimp is a great source of lean protein, making these shrimp balls a satisfying appetizer or main dish. The fat content primarily comes from the frying oil, which can be reduced by opting for baking or air frying methods. The carbohydrates largely stem from the coating used, which can be adjusted depending on your dietary preferences.
Discussion on Modifications for Dietary Restrictions
For those with dietary restrictions, gluten-free breadcrumbs can be used in place of regular breadcrumbs, making the dish suitable for gluten-free diets. Additionally, for a low-carb option, consider using crushed pork rinds or almond flour as a coating instead of breadcrumbs. These modifications allow everyone to enjoy this delicious dish without compromising on flavor.
Conclusion
Crispy shrimp balls with sweet chili sauce are not just a delightful treat; they’re a testament to the joys of cooking at home. The process of preparing these flavorful bites is straightforward, making them perfect for gatherings, family dinners, or simply indulging yourself.
The appeal of this dish lies in its versatility and the ability to impress guests with minimal effort. Whether served as an appetizer or incorporated into a larger meal, shrimp balls are sure to be a hit. So gather your ingredients, follow the steps, and enjoy the satisfaction of homemade cuisine. These shrimp balls are bound to become a favorite in your culinary repertoire, making every occasion just a little more special.