Indulging in a rich dessert is one of life’s greatest pleasures, and there’s nothing quite like the combination of chocolate and hazelnuts to elevate your sweet experience. Chocolate is a universal favorite, and when paired with the distinct, nutty flavor of hazelnuts, it creates a harmony that tantalizes the taste buds. This article presents a detailed recipe for decadent chocolate hazelnut mousse cups—a delightful treat that combines the smoothness of dark chocolate with the comforting richness of hazelnut spread. Whether you’re hosting a dinner party, celebrating a special occasion, or simply craving something sweet, these mousse cups are sure to impress your guests and provide a blissful experience for your palate.
Understanding the Ingredients
Creating the perfect chocolate hazelnut mousse requires understanding the key components that contribute to its luxurious texture and flavor. Each ingredient plays a vital role in achieving the desired outcome, so let’s delve into what makes this dessert so special.
Dark Chocolate: The Foundation of Flavor
At the heart of any chocolate mousse is dark chocolate, and for this recipe, we recommend using chocolate with a cocoa content of at least 70%. This high percentage of cocoa not only ensures a rich chocolate flavor but also provides several health benefits. Dark chocolate is known for its antioxidant properties, which can contribute to improved heart health and lower blood pressure. Additionally, the intense flavor of dark chocolate complements the sweetness of the other ingredients, balancing the overall taste of the mousse.
When selecting your dark chocolate, consider opting for high-quality brands that use minimal additives. This choice will enhance the depth of flavor in your mousse, ensuring that each spoonful is a decadent experience.
Heavy Whipping Cream: For Creaminess and Texture
To achieve the light and airy texture characteristic of mousse, heavy whipping cream is essential. The fat content in heavy cream (typically around 36%) allows it to be whipped into stiff peaks, creating volume and a luscious mouthfeel. The whipped cream serves as the base for your mousse, incorporating air and providing the dessert with its signature fluffiness.
When whipping your cream, it’s crucial to start with cold equipment—chilling your mixing bowl and beaters can help achieve the best results. The temperature helps the cream whip faster and improves its ability to hold its shape.
Hazelnut Spread: Adding Depth and Nutty Flavor
No chocolate hazelnut mousse would be complete without the addition of hazelnut spread. This ingredient not only enhances the overall flavor profile but also adds a creamy texture that complements the dark chocolate beautifully. Popular brands like Nutella offer a delicious balance of sweetness and nuttiness, but you might also find artisanal hazelnut spreads that use higher-quality ingredients for a more sophisticated taste.
When incorporating hazelnut spread into your mousse, consider the ratios carefully to ensure that the nutty flavor shines through without overpowering the chocolate. A well-balanced combination will elevate your mousse, making it an unforgettable dessert.
Powdered Sugar and Vanilla Extract: Sweetening and Flavoring
To bring the flavors together, powdered sugar is utilized in the mousse recipe. Unlike granulated sugar, powdered sugar dissolves quickly, which is crucial for maintaining the smooth texture of the mousse. It adds just the right amount of sweetness to balance the bitterness of the dark chocolate while allowing the other flavors to emerge.
Vanilla extract is another key ingredient that enhances the overall flavor. A splash of pure vanilla extract can elevate the taste profile of your dessert, providing a subtle warmth that complements the chocolate and hazelnut flavors. Always opt for pure vanilla extract over synthetic alternatives for the best results.
Garnishes: Elevating Presentation and Taste
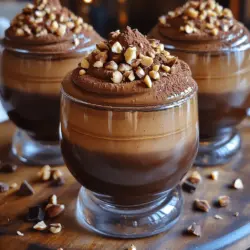
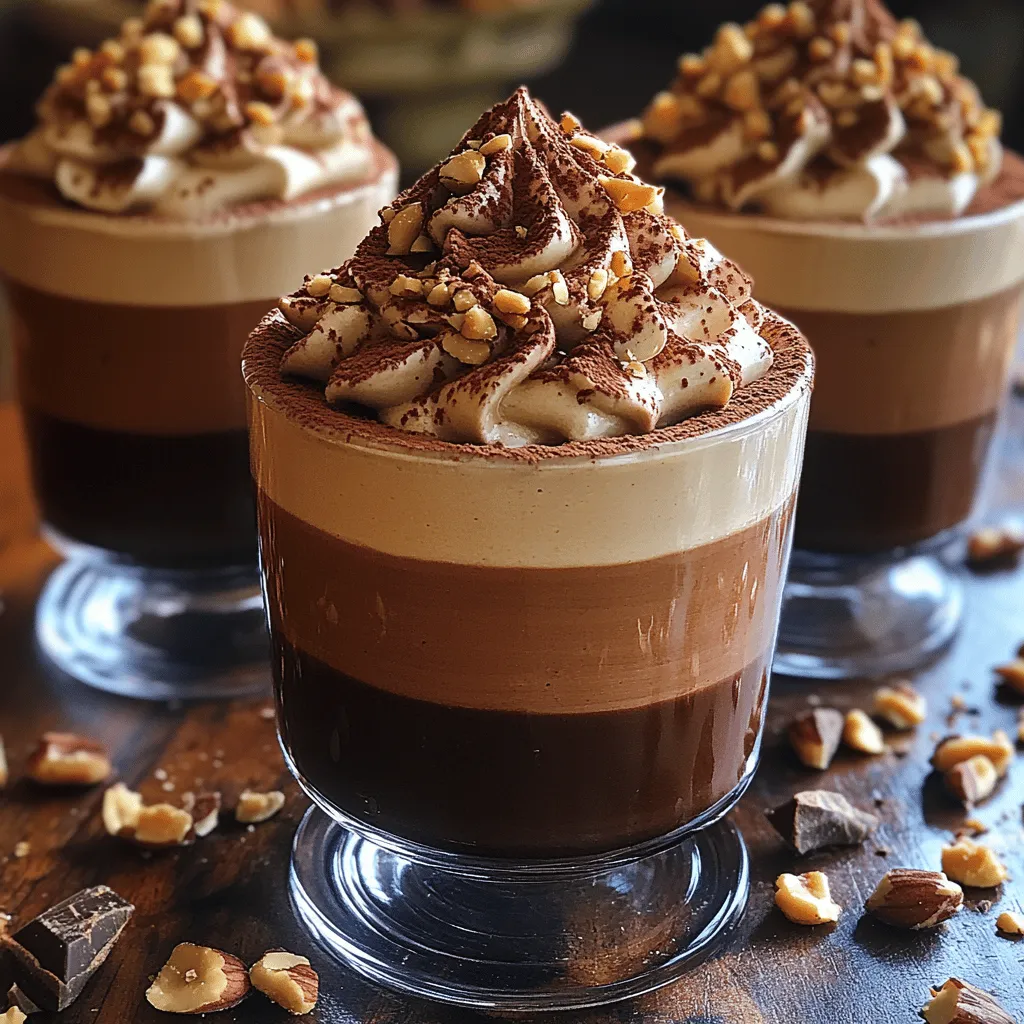
Presentation is an important aspect of any dessert, and garnishes can take your chocolate hazelnut mousse cups to the next level. Consider topping your mousse with chopped toasted hazelnuts for added crunch and flavor. The nutty pieces not only provide a delightful texture contrast but also highlight the hazelnut essence of the dish.
For a finishing touch, a dusting of cocoa powder can enhance the visual appeal, creating a sophisticated look that invites indulgence. You could also consider adding a dollop of whipped cream or a drizzle of chocolate sauce to make these mousse cups even more irresistible.
Step-by-Step Preparation Guide
Creating decadent chocolate hazelnut mousse cups may seem daunting, but with a clear step-by-step guide, you can master this delightful dessert in no time. Below, we outline the essential preparations, from melting the chocolate to achieving the perfect consistency for your mousse.
Melting the Chocolate: Techniques for Success
The first step in preparing your chocolate mousse is to melt the dark chocolate. There are two effective methods for doing this: using a double boiler or a microwave.
1. Using a Double Boiler: This method ensures that the chocolate melts gently without the risk of burning. To create a double boiler, fill a saucepan with a few inches of water and place a heatproof bowl on top, making sure the bottom of the bowl doesn’t touch the water. Bring the water to a simmer, then add your chopped dark chocolate to the bowl. Stir the chocolate occasionally until it is completely melted and smooth. Remove from heat and allow it to cool slightly.
2. Microwave Melting: If you choose to use a microwave, be cautious to avoid burning the chocolate. Place the chopped chocolate in a microwave-safe bowl and heat it in short bursts of 15-20 seconds, stirring in between each interval. This method is quick and convenient but requires careful attention to prevent overheating.
Regardless of the method you choose, allow the melted chocolate to cool slightly before incorporating it into the mousse mixture. Hot chocolate can deflate the whipped cream, preventing your mousse from achieving its desired lightness.
Whipping the Cream: Achieving Perfect Peaks
Once your chocolate has melted and cooled, it’s time to whip the heavy cream. Start by pouring the cold heavy whipping cream into your chilled mixing bowl. Using an electric mixer, beat the cream on medium speed until it begins to thicken, then increase the speed to high. Keep an eye on the cream as it whips; you want to achieve stiff peaks, which are crucial for the mousse’s structure.
Stiff Peaks Explained: Stiff peaks occur when the whipped cream holds its shape, standing straight up when the beaters are lifted. This consistency is vital for ensuring that the mousse remains airy and doesn’t collapse.
Timing is important here, as over-whipping can lead to a grainy texture or even butter. Stop whipping as soon as the cream reaches the desired consistency, and set it aside while you prepare the chocolate-hazelnut mixture.
Mixing Chocolate and Hazelnut Spread: The Perfect Combination
With your chocolate melted and your cream whipped, it’s time to bring these two components together. In a separate mixing bowl, combine the melted chocolate and hazelnut spread. Gently fold the two together until well combined, taking care not to deflate the mixture.
Next, carefully incorporate the whipped cream into the chocolate-hazelnut mixture. Use a spatula to fold in the whipped cream, starting with a small amount to lighten the chocolate mixture, then gradually adding the rest. This technique helps maintain the airiness of the whipped cream while ensuring that the chocolate and hazelnut spread are evenly distributed throughout the mousse.
Ensure that there are no visible streaks of whipped cream or chocolate, but be gentle to avoid losing the volume you’ve created. Once fully combined, you’ll have a luxurious mousse ready to be spooned into your serving cups.
—
By following these detailed instructions and understanding the ingredients that contribute to the enchanting flavor and texture of chocolate hazelnut mousse cups, you’re well on your way to creating a truly decadent dessert. This recipe promises to delight and impress, making it a perfect choice for any occasion. Stay tuned as we delve into more techniques and serving suggestions to elevate your dessert experience further.
Best Practices for Folding Ingredients to Maintain Airiness
Achieving the perfect texture in your chocolate hazelnut mousse cups hinges on the technique of folding ingredients together. This method is crucial for incorporating air while keeping the mixture light and fluffy. To fold correctly, use a rubber spatula or a large spoon, and follow these steps:
1. Cut Down the Center: Insert the spatula into the mixture and cut down the center to the bottom of the bowl.
2. Lift and Turn: Gently lift the mixture from the bottom and turn it over onto itself.
3. Rotate the Bowl: As you fold, rotate the bowl with your other hand to evenly integrate the ingredients without deflating the air you’ve just whipped in.
Folding should be done with a gentle touch, ensuring that the mixture remains airy and voluminous, which is essential for the lightness of your mousse.
Importance of Temperature When Combining Mixtures
Temperature plays a pivotal role in the success of your mousse. When combining the chocolate-hazelnut mixture with whipped cream, ensure that both components are at similar temperatures. If the chocolate mixture is too warm, it can cause the whipped cream to melt, leading to a dense texture rather than the desired lightness. Conversely, if the chocolate is too cool, it can seize or become clumpy when mixed with the cream.
Incorporating Whipped Cream: Maintaining Lightness
Using whipped cream is what gives your mousse its light, airy quality. Here are some techniques to ensure that you incorporate it perfectly:
Techniques for Gently Folding Whipped Cream into the Mixture
1. Whip the Cream to Soft Peaks: Start with chilled heavy cream, whipping it until it forms soft peaks. This indicates that the cream has enough air incorporated without being overly stiff.
2. Add a Small Amount First: Take a small portion of the whipped cream and mix it into the chocolate-hazelnut mixture. This will lighten the base and make it easier to fold in the rest of the cream.
3. Integrate Gently: Add the remaining whipped cream and use the folding technique discussed earlier. Remember to be gentle; the goal is to keep as much air in the whipped cream as possible.
Avoiding Over-Mixing to Preserve Texture
Over-mixing can lead to a dense mousse that lacks the desired lightness. Always stop mixing as soon as you no longer see streaks of whipped cream; a few small lumps are perfectly acceptable. This will ensure your mousse retains its airy consistency.
Filling the Cups: Presentation Tips
How you fill your mousse cups can significantly impact their presentation. Here are some techniques to consider:
Suggestions for Piping vs. Spooning the Mousse
– Piping: For a more refined look, transfer the mousse to a piping bag fitted with a star or round tip. This allows you to create decorative swirls and peaks in each cup, enhancing visual appeal.
– Spooning: If you prefer a more rustic look, simply spoon the mousse into the cups. This method is quicker and can create a charming, homemade vibe.
Techniques for Smoothing the Tops and Removing Air Bubbles
After filling the cups, you may want to smooth the tops for a polished finish. Use an offset spatula or the back of a spoon to gently level the mousse. To eliminate any air bubbles, lightly tap the filled cups on the countertop. This will encourage the mousse to settle and create a smooth surface.
Chilling Time: Why It’s Crucial for Mousse
Chilling is an essential step in making mousse. It allows the mixture to set properly, resulting in a creamy, stable texture. The chilling time varies depending on the recipe and the size of your cups, but here are some general guidelines:
Explanation of Why Chilling is Necessary for Setting
Chilling allows the gelatin (if used) to firm up and the flavors to meld beautifully. The cold temperature helps to stabilize the whipped cream and chocolate mixture, providing the mousse with structure and creaminess.
Ideal Chilling Times and Conditions
For optimal results, chill the mousse cups for at least 2 to 3 hours in the refrigerator. If time allows, letting them sit overnight will enhance the flavors even further. Ensure that the cups are covered with plastic wrap or a lid to prevent them from absorbing any odors from the refrigerator.
Garnishing and Serving Suggestions
Enhancing the experience of your chocolate hazelnut mousse cups extends beyond just the taste; presentation matters too. Here are some thoughtful serving suggestions:
Choosing the Right Glassware for Serving
Selecting the appropriate glassware can elevate your dessert experience. Consider these options:
– Dessert Cups: Clear glass dessert cups allow for a beautiful view of the mousse layers and garnishes. Opt for sizes that are easy to handle and serve.
– Shot Glasses: For a fun twist, serve the mousse in shot glasses; this is perfect for parties, allowing guests to sample without feeling too indulgent.
– Stemmed Glasses: Elegant stemmed glasses create a sophisticated atmosphere, ideal for formal occasions.
Garnishing Techniques for Visual Appeal
Garnishing adds a final touch that enhances both the visual presentation and flavor. Here’s how to do it effectively:
1. Dusting Cocoa Powder: To add a touch of elegance, use a fine sieve to dust cocoa powder over the top of the mousse. This adds a rich chocolatey finish that complements the flavors.
2. Sprinkling Hazelnuts: Finely chop roasted hazelnuts and sprinkle them on top for a delightful crunch. This not only enhances texture but also ties back to the nutty flavor profile of the mousse.
Pairing Suggestions for a Complete Dessert Experience
To elevate your dessert experience, consider pairing your chocolate hazelnut mousse cups with complementary flavors and beverages:
Recommended Beverages to Serve with Mousse Cups
– Coffee: A rich espresso or a creamy cappuccino pairs beautifully with the chocolate, balancing the sweetness of the mousse.
– Dessert Wines: Sweet dessert wines like Sauternes or a rich port can accentuate the deep flavors of chocolate and hazelnuts.
– Herbal Teas: For a non-caffeinated option, try serving with a soothing herbal tea, such as chamomile or mint, which cleanse the palate.
Complementary Flavors that Enhance the Overall Taste
Consider adding a dollop of salted caramel or a berry compote on the side. The saltiness from caramel enhances the chocolate, while the acidity from berries can offset the richness of the mousse, creating a harmonious experience.
Nutritional Information and Dietary Considerations
Understanding the nutritional value of your dessert is essential for health-conscious individuals. Here’s a breakdown of what’s in each serving:
Breakdown of Ingredients for Health-Conscious Readers
– Caloric Content: Each mousse cup typically contains around 300-350 calories, depending on portion size and specific ingredients used.
– Macronutrient Information: Expect approximately 20 grams of fat (primarily from the cream and chocolate), 30 grams of carbohydrates, and 4 grams of protein per serving.
– Potential Allergens and Substitutions for Dietary Needs: Be mindful that this recipe contains dairy and nuts. For a dairy-free version, substitute with coconut cream, and for nut allergies, you can use sunflower seed butter instead of hazelnut spread.
Conclusion: The Joy of Indulging in Chocolate Hazelnut Mousse Cups
Decadent chocolate hazelnut mousse cups are not just a dessert; they are an experience that combines rich flavors and luxurious textures. The process of making them may seem elaborate, but each step contributes to the final product’s delightful taste and presentation. Suitable for a variety of occasions, these mousse cups can bring joy to any gathering or serve as a personal treat. Embrace the pleasure of creating this indulgent dessert and savor the bliss that comes with each delightful spoonful.