Introduction
In the world of desserts, few things capture the hearts (and taste buds) of dessert lovers quite like no-bake treats. The allure of no-bake desserts lies in their simplicity and the ease with which they come together, making them a go-to choice for both beginner and seasoned bakers. One such delectable creation that has gained immense popularity is the No Bake Oreo Peanut Butter Cup Cheesecake. This dessert combines the beloved flavors of classic Oreo cookies, rich peanut butter, and smooth chocolate into a creamy cheesecake that is sure to impress.
The Oreo Peanut Butter Cup Cheesecake is not just another dessert; it’s a celebration of flavors that brings together the crunch of Oreos, the creaminess of cheesecake, and the indulgence of peanut butter cups. Whether you are hosting a gathering, celebrating a special occasion, or simply treating yourself, this cheesecake is an easy, scrumptious option that requires no baking – just mix, layer, chill, and enjoy.
As we dive deeper into the world of no-bake cheesecakes, let’s explore what makes them so special, the ingredients that come together to create this dessert masterpiece, and the initial steps needed to prepare the crust.
Understanding No-Bake Cheesecakes
No-bake cheesecakes are a unique twist on the traditional baked cheesecake, allowing for a creamy, rich dessert without the need for an oven. These cheesecakes rely on a combination of cream cheese and whipped cream to achieve their signature texture, which is light and fluffy yet decadent. Typically, no-bake cheesecakes are set in the refrigerator, allowing the flavors to meld together while the cheesecake firms up.
Benefits of No-Bake Cheesecakes
One of the most significant advantages of no-bake cheesecakes is their convenience. They require minimal preparation time and no baking, making them perfect for those who may be intimidated by traditional baking techniques. Additionally, no-bake cheesecakes can be made ahead of time, allowing you to serve a delicious dessert without the stress of last-minute preparations.
Another appealing aspect of no-bake cheesecakes is their versatility. The base can easily be adapted to include various flavors and ingredients, from fruit to chocolate, allowing for a world of creative possibilities. You can customize the filling, crust, and toppings to suit your preferences or dietary needs, making no-bake cheesecakes a favorite among home cooks and dessert enthusiasts alike.
Ingredients Breakdown
To create a No Bake Oreo Peanut Butter Cup Cheesecake, you’ll need a handful of simple yet flavorful ingredients. Each component plays a crucial role in building the cheesecake’s depth and richness, ensuring that every bite is a delightful experience.
The Crust
The crust is the foundation of any cheesecake, and for this recipe, we will use Oreo cookies as the base. The chocolatey flavor of Oreos pairs perfectly with the creamy filling, while their crunchy texture provides a satisfying contrast. To create the crust, Oreos are crushed and mixed with melted butter. The butter helps to bind the crushed cookies together, ensuring that the crust holds its shape when sliced. Together, they form a rich, flavorful, and decadent base for the cheesecake.
The Filling
The filling is where the magic happens, and it consists of the following key ingredients:
– Cream Cheese: This is the base of the cheesecake, providing a smooth and creamy texture. Softened cream cheese is essential for achieving that luscious mouthfeel that defines a great cheesecake.
– Peanut Butter: Adding peanut butter not only enhances the flavor profile but also contributes to the richness of the filling. Creamy peanut butter is recommended for a smooth texture, while crunchy peanut butter can add an enjoyable crunch.
– Powdered Sugar: This ingredient is essential for sweetness and ensuring a smooth consistency. Powdered sugar blends easily with the cream cheese and peanut butter, preventing any graininess.
– Vanilla Extract: A splash of vanilla extract elevates the flavors of the filling, adding warmth and depth to the overall taste.
– Heavy Whipping Cream: Whipped to soft peaks, heavy cream is folded into the filling to create an airy, light texture. This is crucial in balancing the richness of the cream cheese and peanut butter, giving the cheesecake its delightful fluffiness.
The Topping
To finish off this decadent cheesecake, we will add a few delightful toppings:
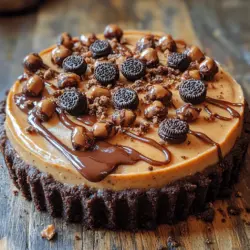
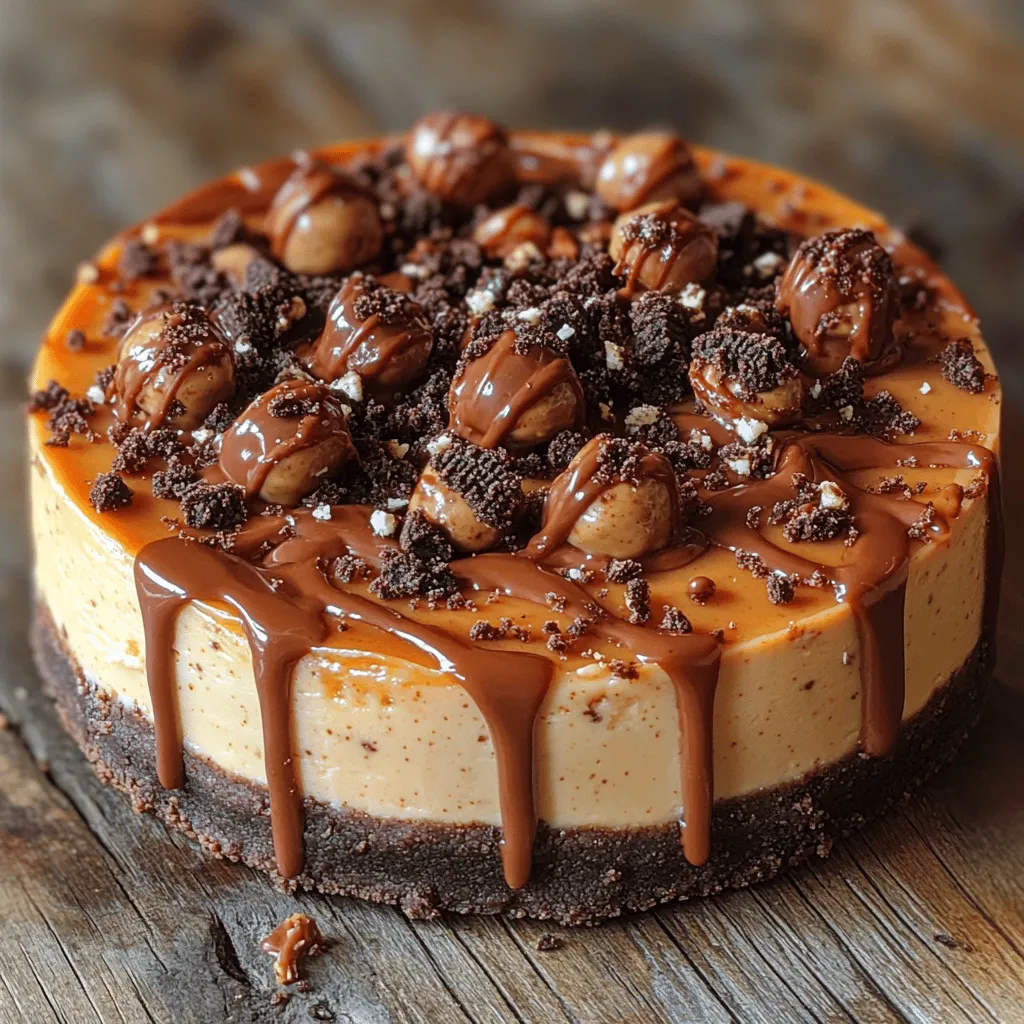
– Mini Reese’s Peanut Butter Cups: These bite-sized treats provide an extra dimension of flavor and texture. Chopped or halved, they can be sprinkled on top of the cheesecake for a delightful surprise in every bite.
– Crushed Oreos: A sprinkle of crushed Oreos not only adds visual appeal but also reinforces the Oreo flavor throughout the cheesecake, creating a beautiful contrast against the creamy filling.
– Chocolate Sauce: For an indulgent finishing touch, a drizzle of chocolate sauce adds richness and a touch of elegance. It can be served on top or on the side for a fun presentation.
Step-by-Step Instructions
Now that we have a clear understanding of the ingredients and their roles, let’s move on to the preparation of the crust.
Preparation of the Crust
1. Gather Your Ingredients: Begin by gathering your Oreo cookies and unsalted butter. You will need approximately 24 Oreo cookies for the crust and ½ cup of melted butter.
2. Crush the Oreos: Place the Oreo cookies in a food processor and pulse until they reach a fine crumb consistency. If you don’t have a food processor, you can place them in a zip-lock bag and use a rolling pin to crush them.
3. Mix with Butter: In a mixing bowl, combine the crushed Oreos with the melted butter. Stir until the mixture is well combined and resembles wet sand.
4. Press into a Springform Pan: Transfer the Oreo mixture into a 9-inch springform pan. Using the back of a measuring cup or your fingers, firmly press the mixture into the bottom of the pan, ensuring it is evenly distributed and compacted.
5. Chill the Crust: Place the crust in the refrigerator for at least 10-15 minutes to set while you prepare the filling. This will help the crust hold its shape when you pour in the filling.
Following these initial steps will set the stage for creating the creamy filling that will elevate this No Bake Oreo Peanut Butter Cup Cheesecake to a whole new level. Stay tuned as we delve into the exciting process of preparing the filling in the next section, where the true magic happens.
Importance of Using a Food Processor for Fine Crumbs
When making the crust for your No Bake Oreo Peanut Butter Cup Cheesecake, using a food processor is key. This handy kitchen appliance ensures that the Oreo cookies are ground into fine crumbs, which is essential for achieving a smooth and cohesive crust. A food processor can break down the cookies efficiently, allowing for a denser and more flavorful base. If you don’t have a food processor, you can place the cookies in a resealable plastic bag and crush them with a rolling pin, but it may take longer to achieve the same fine texture.
Tips for Achieving the Perfect Crust Consistency
To ensure your crust has the ideal consistency, follow these tips:
1. Proportions: Use the right ratio of crushed cookies to melted butter. The general rule is to use about 1 ½ cups of crushed Oreo cookies mixed with ½ cup of melted butter. This balance gives you a firm and flavorful crust that holds together well.
2. Mix Thoroughly: After combining the crumbs with melted butter, mix until all the crumbs are evenly coated. You should be able to squeeze a handful of the mixture, and it should hold its shape.
3. Press Firmly: When pressing the crust mixture into the bottom of your pan, use a flat-bottomed measuring cup or the back of a spoon for even pressure. Make sure to press it down firmly to create a solid base that won’t crumble when serving.
Making the Cheesecake Filling
Now that your crust is ready, it’s time to create the rich and creamy filling that makes this cheesecake irresistible.
Techniques for Mixing Cream Cheese and Peanut Butter to Avoid Lumps
Start with room temperature cream cheese to make mixing easier. If your cream cheese is cold, it can create lumps in the mixture. Beat the cream cheese in a mixing bowl with an electric mixer on medium speed until smooth. Then, gradually add in the peanut butter. Mixing these two together thoroughly is crucial to achieving a silky texture. Add a pinch of salt to enhance the flavors, and don’t forget to scrape down the sides of the bowl to incorporate all ingredients evenly.
Importance of Whipping Heavy Cream to Stiff Peaks for Light Texture
The key to a light and airy cheesecake filling lies in how you whip the heavy cream. Begin by chilling your mixing bowl and beaters in the freezer for about 10 minutes. This helps the cream whip up faster. Beat the heavy cream on medium-high speed until it starts to thicken, then increase to high speed until it reaches stiff peaks. Stiff peaks mean that the cream holds its shape and doesn’t droop when you lift the beaters. This will give your cheesecake a delightful, fluffy texture.
How to Gently Fold Whipped Cream into the Peanut Butter Mixture
Once your whipped cream is ready, it’s time to fold it into the peanut butter mixture. Use a spatula for this step and be gentle to preserve the airiness of the whipped cream. Start by adding about a third of the whipped cream to the peanut butter mixture. Stir gently until just combined. Repeat this process, incorporating the remaining whipped cream in two more additions. This method ensures that your filling remains light and fluffy, rather than dense.
Assembling the Cheesecake
With the crust and filling ready, it’s time to bring your No Bake Oreo Peanut Butter Cup Cheesecake together.
Tips for Pouring and Spreading the Filling Evenly Over the Crust
Pour the cheesecake filling directly onto the prepared Oreo crust. Use an offset spatula or the back of a spoon to spread the filling evenly across the crust. This helps to ensure that each slice will have a uniform amount of filling. Be patient and take your time to create a smooth top; a well-spread cheesecake looks more appealing when served.
How to Incorporate Toppings for Visual Appeal and Flavor
For the finishing touch, consider adding toppings for both visual appeal and enhanced flavor. Some popular options include:
– Chocolate Ganache: Melt chocolate with a bit of cream and pour it over the cheesecake before it sets for a glossy finish.
– Crushed Oreos: Sprinkle crushed Oreos over the top for added texture and taste.
– Peanut Butter Drizzle: Warm some peanut butter and drizzle it over the cheesecake for a decadent touch.
Feel free to get creative with your toppings; they not only enhance the flavor but also add a beautiful presentation.
Chilling the Cheesecake
After assembling your cheesecake, it is crucial to chill it properly.
Explanation of Refrigeration Time and Its Significance for Setting
Refrigerate the cheesecake for at least 4 to 6 hours, or overnight if possible. Chilling allows the filling to set properly, ensuring that when you slice into it, it holds its shape beautifully. The cooling time also melds the flavors, making each bite even more delicious.
Recommended Storage Methods to Maintain Freshness
To store your cheesecake properly, cover it tightly with plastic wrap or aluminum foil. If you have a cake dome, that can work well too. The cheesecake can stay fresh in the refrigerator for up to 5 days, making it a great dessert option for gatherings or meal prep.
Serving Suggestions
When it comes time to serve your No Bake Oreo Peanut Butter Cup Cheesecake, consider these presentation ideas and pairing options.
Presentation Ideas for Serving the Cheesecake
– Slice Neatly: Use a sharp knife dipped in hot water to make clean cuts. Wipe the knife between slices for a neat appearance.
– Garnish: Top each slice with a dollop of whipped cream, a sprinkle of crushed Oreos, or a few chocolate shavings for an elegant touch.
– Plating: Serve slices on chilled dessert plates for an extra touch of sophistication.
Pairing Options Such as Coffee or Dessert Wine
This creamy cheesecake pairs wonderfully with a variety of beverages:
– Coffee: A strong cup of coffee complements the sweetness of the cheesecake and balances the rich flavors.
– Dessert Wine: A sweet dessert wine, such as a late-harvest Riesling, can enhance the indulgence of the cheesecake.
– Milk: Classic and comforting, a glass of cold milk is a perfect accompaniment for this dessert.
Suggestions for Festive Occasions or Gatherings Where This Cheesecake Would Shine
This No Bake Oreo Peanut Butter Cup Cheesecake is ideal for various occasions:
– Birthdays: Impress guests with this show-stopping dessert at birthday celebrations.
– Holidays: Serve it during festive gatherings like Thanksgiving or Christmas for a rich treat.
– Potlucks: Its no-bake nature makes it a perfect dish to transport to potlucks or picnics.
Nutritional Information
Understanding the nutritional aspects of your cheesecake can help you enjoy it responsibly.
Overview of the Nutritional Aspects of the Cheesecake
A typical slice of No Bake Oreo Peanut Butter Cup Cheesecake contains approximately:
– Calories: 350-450, depending on portion size
– Fat: 25-30 grams
– Carbohydrates: 30-35 grams
– Protein: 5-7 grams
While this dessert is indulgent, it can be enjoyed in moderation as part of a balanced diet.
Consideration of Portion Sizes and Indulgence in Desserts
Be mindful of portion sizes; a smaller slice can satisfy your sweet tooth while still allowing room for other treats. Enjoying dessert occasionally is a wonderful way to indulge, as long as it is balanced with healthy eating habits.
Discussion of Potential Ingredient Substitutions for Dietary Restrictions
For those with dietary restrictions, consider these substitutions:
– Gluten-Free Oreos: Use gluten-free cookies if you need a gluten-free option.
– Reduced Sugar Options: Substitute regular peanut butter with a natural or reduced sugar version to lower the sugar content.
– Dairy-Free Alternatives: Use dairy-free cream cheese and whipped topping to create a vegan version of this cheesecake.
Conclusion
Creating a No Bake Oreo Peanut Butter Cup Cheesecake is a delightful experience that combines simplicity with indulgent flavors. The beautiful layers of creamy peanut butter filling and crunchy Oreo crust come together effortlessly, making it a must-try for both novice and experienced bakers. This dessert is perfect for personal enjoyment or impressing guests at celebrations.
With its rich flavors and easy preparation, we encourage you to make this cheesecake and savor each bite. The joy of combining beloved flavors into a delicious, no-bake dish is truly unmatched. Whether enjoyed alone or shared with friends and family, this cheesecake is sure to become a favorite in your dessert repertoire.